


4/22/2013
Well seeing that there had been a large number of threads opened about which spec to use, what gems, enchants and rotations i decided to make this guide to help new mages to better understand mage in PvE. This guide will include Specs/Gear/Rotation/Enchants/Glyphs and other important stuff that there is to know about mages in pve. Lets begin
1. Specs
There are three specs viable in patch 3.3.5, 2 fire specs and 1 arcane.
- Arcane - The reason i didnt pick Arcane Barrage is because it is a huge dps loss if you use it even when moving (You can blink first and then cast your arcane missiles). Can move 2 Ice Shards points to Frost Warding, and trade points between Arcane Stability and Arcane Focus depending on how much hit vs pushback prevention you need. This is a good raid compromise with 3/5 Arcane Stability giving 100% pushback prevention with Imp. Concentration Aura.
This spec is good for short fight and fight where there isnt much movement involved.
Stat priority for Arcane mages goes like this: SP>Haste>Intelect>Crit>Spirit
Rotation for this spec is: Arcane Blast x4 >>Arcane Missiles on Misslie Barrage proc, if you go low on mana lower the stacks of Arcane Blast to suit your needs.
Glyphs for this spec are: Glyph of Arcane Misslies, Glyph of Arcane Blast and Glyph of Molten Armor
Cooldowns: The best time to use Icy Veins is with Trinket proc or trinket on use and together with Mirror Images (if you have 4p t10)
- Fireball/TTW - Considered as the top raiding spec for 3.3.5. I noticed that TTW got fixed so this spec is on par if not better than FFB spec (still needs some testing to be done). Main nuke is Fireball.
Stat priority for Fireball/TTW spec is: Crit>SP>Haste>Spirit>Intelect
- Get around 50-60% crit self buffed then switch to haste and SP. Fireball spec requires more haste than FFB to actualy be effective (800-900 should be sufficient, if you can get more but dont sacrifice too much crit) so keep that in mind.
Rotation for Fire spec is: Scorch every 30 seconds to keep the 5% crit debuff up>>Spam Fireball untill hotstreak procs>>Pyroblast
Glyphs used for this spec are: Glyph of Fireball, Glyph of Living Bomb and Glyph of Molten Armor
Cooldowns: Fire mages dont have any cooldowns exept Combustion. This should be used whenever its off cooldown. Delay the usage of Combustion if the boss is near ~35% and use it when he drops below 35% for better crits and together with 4p t10 bonus. The 4p t10 bonus must ALWAYS be used when the boss is below 35% or with bloodlust up.
- FFB (Frostfire) - This spec is on par with the Fireball/TTW spec above. I made some changes when LB was not triggering Hot Streak and picked Cold Snap. Now when this is fixed i think the dps loss is not noticeable and u can use LB instead.
Only difference between fireball spec and this one is that in this spec your main nuke will be Frostfire Bolt instead of Fireball.
Stat priority is the same as Fireball spec above.
- Very crit dependat spec. You need crit as much as possible. Never gem for Haste...All the haste you need comes from gear.
Rotation for this spec is: Scorch every 30 secs>>Spam FFB untill hotstreak procs>Pyroblast
Glyphs for this spec are: Glyph of Frostfire, Glyph of Molten Armor and Glyph of Scorch/Living Bomb
Cooldowns: Icy Veins and Combustion and maybe Cold snap. Use Icy Veins whenever its Off cooldown, same with Combustion. Use Cold snap to refresh Icy Veins when the boss is ~35% together 4p t10 bonus to sky rocket your dps.
2. Gear
Gearing your mage mostly depends on your spec. If you are fire mage you get gear with more crit on it and if you are arcane you get gear with more haste. Below i will post a list of the BiS items for Fire/TTW, FFB and Arcane mage. Bear in mind that the gear for a specific slot can change depending on stats.

3. Enchants
Head: Arcanum of Burning Mysteries (Kirin Tor)
Shoulders: Greater Inscription of the Storm (Sons of Hodir exalted) or Master's Inscription of the Storm (only for Scribes)
Cloak: Lightweave Embrodiery (only for tailors) or Greated Speed
Chest: Powerfull Stats
Bracers: Superior Spellpower or Fur Lining - Spellpower (only for leatherworkers)
Hands: Exeptional Spellpower or Hyper speed accelerators (only for engineers)
Belt: Socket Bonus
Leggings: Brilliant Spellthread
Boots: Ice Walker
Ring 1/2: Spellpower (only for enchanters)
Main Hand: 63 spellpower or Black Magic
4. Gems
When it comes to gems you gem your mage according to your spec.
For arcane mage:
Red slots = Runed Cardinal Ruby or Runed Dragon's Eye if you are JC
Yellow slots = Quick King's Amber or Dragon's Eye if you are JC
Blue slots = Purified Dreadstone
For Fire mage:
Red slots = Runed Cardinal Ruby or Potent Ametrine
Yellow slots = Reckless or Potent Ametrine or Smooth King's Amber
Blue slots = Purified Dreadstone
Meta gem = Chaotic Skyflare Diamond ( For both specs ) OR Destructive Skyflare Diamond
5. Stats
45.91 Crit Rating = 1% Crit Chance - Critical is the most valuable stat for Fire/TTW and FFB mages. The more critical you have the more dps you will do, simple as that. But when you get around 48-50% critical, crit begins to lose its value and haste is preffered.
32.79 Haste Rating = 1% Spell Haste - Most important stat for Arcane mages. As arcane mage you need as much haste as possible.
166.6667 Intellect = 1% Crit Chance - Good stat to focus on as arcane mage since it gives you more mana and crit aswell.
26.232 Hit Rating = 1% Hit Chance - I think geting hit caped goes without saying and it should be priority number one for any mage. The hard cap is 17%. The soft cap varies and depends on your spec and race.
Draenei racial gives 1% Hit rating so you will need 16%.
If you have boomkin or spriest in raid they provide 3% hit rating so that will make 14% (13% if draenei)
As fire mage you will need 11% (10% as draenei) hit and as arcane you will need 8% (7% as draenei) because of precision and arcane focus.
Races and their usefull (for mages) racials
Horde side
Undead - Trinket like racial, good for pvp
Troll - 20% haste for 10 secs every 3 mins, best mage race imo
Blood Elf - Has silence and can restore mana, good for pvp and arcane mage too
Alliance side
Human - More spirit = more crit and trinket like racial, good for pve and pvp too
Gnome - More intelect = more mana/crit and racial that removes snares (doesnt share CD with pvp trinket), best class for mages on ally side imo
Draenei - 1% Hit rating, good if you want to lower the hit cap but i wouldnt roll draenei mage because 99% of the time you will have atleast 1 draenei in your raid.
Constructive Criticsm is always welcome.
Thank you for reading this i hope it helps you
2/19/2013
By Turbolqk
Welcome to my guide. I will help all of you newbs or pros with some tips on everything a Frost death knight should know. Let us go now.
Some useful tips:
● Running with two weapons, one enchanted with Rune of the Fallen Crusader and and the other with Rune of Swordshattering, is always good. Switch weapons when you think you will get disarmed.
● Using Death Grip on a mage and casting Dark Simulacrum after that would probably get you a Blink. I rather wait them Blink and then Death Grip. Pro mages can waste your Dark Simulacrum.
● If you steal Deep Freeze from a mage, Chains of Ice/Hungering Cold him and enjoy the stun.
● Always watch you runic power and be sure to spend it if It's about to reach 130 runic power. And for newbs, Death Coil if you are getting kited.
● Necrotic Strike's casting increase debuff also causes warlock's DoTs to tick slower. QQ.
● Using Pillar of Frost when Lichborne + Death Coil healing will result in bigger heals due to the huge attack power increase. Almost as Unholy!
● Anti-Magic Shell can be used both to prevent a burst and to prevent ccs (Polymorph) when bursting someone. Hex and Cyclone are bugged and go through the spell. Watch out!
● Using Death & Decay wont break Hungering Cold.
● Priests hate when you Chains of Ice their Shadow Fiend.
● Howling Blast is a great CC breaker. Be careful not to screw up a cc chain.
● Death Pact works on Army of the Dead ghouls too. Too bad Army does not work in arena.
● Using Death Coil on a kiting foe will probably get you some runes refreshed for some more Howling Blast ownage.
● Just to note, Howling Blast generates additional runic power when striking more then one targets.
● Always keep Plague Strike bound. You can't rely on Outbreak if you need both diseases for Obliterate. Also, Cloack of Shadows + Plague Strike = CoS fail.
● Since Blood Presence makes you heal less due to Dark Succor working only in Unholy or Frost presence you will stay in Unholy. There is a good use for Blood presence thought: when waiting for this annoying stealth class to open on you. Switch back to Unholy ASAP! Forget about Frost presence.
Jigslol says some pro stuff:
I go blood sometimes, but it's only if I see trouble coming well ahead of time. Going blood when you are almost dead is too little too late. If we are playing something like rogue/feral and they are sitting on me all game. Once I cycle through some defensive CD's and know my healer is vulnerable i will go into blood presence and deathstrike for a bit while my CD's get a bit to catch up.Most of the time blood presence is pretty worthless.
● Lichborne can be used for many things other than just breaking fear. It also prevents:
- Seduce (Will also break this effect on use)
- Sap
- Polymorph
- Hex
- Any form of fear (Will also break this effect on use)
- Mind Control (Will also break this effect on use)
Note: Using Lichborne while bursting someone would probably save you from getting Poly/Hex/Feared or whatever. Also, using it while you are in a crowd effect might spare you a cc. Warstormp -> Hex etc.
● Death and Decay is a great ability to get drinking casters/healers in combat and so is Dark Command.
● Death Grip is also a great interrupt.
● Poisons and Nature's Grasp can't be applied through Anti-Magic Shell.
● Mind Freeze will remove Spell Reflection.
● Dark Command can proc Unholy Strength.
● Using Death Grip on a bladestorming warrior can still pull him next to you. That can help your partner survive.
● Glyph of Chains of Ice's damage portion works through hunter's Deterence.
● Very pro info:
-1 rune ability = 10 runic power;
-2 runes ability = 20 runic power;
-3 runes ability = 30 runic power;
● When kited by a pet class, use his pet to Death Strike on It if you need healing. The enemy will probably remove the pet from you after that. You can still Dark Command It and make it attack you again. Taunting pets on you might also break a cc.
● Macro Dark Command to most of your abilities to prevent casters from getting out of combat without actually pressing it. It's off GCD I beleve.
● If a dk have lots of Necrotic Strikes stacked simply immobilize the him with CoI and run away. The stacks will wear off. QQ.
● Use Outbreak before Obliterate for the bonus damage.
Runeblade
So, let's check out the weapon we can wear. Both two-hand and dual wield are pretty awsome imo, but which one is better theoretically?
● Dual wield does more melee damage. Not really like twice more but still a noticable amount.
● Dual wield has two runeforges. 10% more frost damage if you go with Razorice (like 5 points in mastery, tho it doesn't add up to the mastery itself. It increases the damage already increased by mastery).
● Dual wield goes mastery. Two-hand goes haste. It has been confirmed by gladiators and arena-junkies from posts by the time of patch 4.0.6. Both are very very close in this patch, so close that theyre almost personal choices. The reason two-hand goes haste is Might of the Frozen Wastes. Also, you will be Obliterating cloth/leather targets and mastery wont help in any way.
● Dual wield and two-hand have almost the same Killing Machine proc rate. Their weapon speed is close due to two-hand going for haste (faster hits) and dual wield for mastery (a little slower hits).
● Dual wield gets more mastery thanks to Nerves of Cold Steel. 3% hit allowes you to reforge quite the stats. The weapons themselves combined give less stats than a two-hander though.
● Two-hand gets more runic power. 50% chance pet hit but a fact. More Frost Strikes from time to time.
● Two-hand bursts a little more since the damage is one big hit instead of two small melee damages. Dual wield does more sustained.
● We can safely say that the bonus dual wield damage = the 12% strike damage from Might of the Frozen Wastes.
● Necrotic Strike as a two-hand hits twice the damage dual wield does. Reason is It's not in Treat of Thassarian.
● Dual wield is forced to drop some points for Nerves of Cold Steel. That means you ether lose Obliterate, Runic Power Mastery, Blade Barrier or anything else useful.
It's basically:
● The same KM procs;
● Around same damage;
● More runic power, harder Necrotic Strike and a little more burst as two-hand;
● More mastery, another runeforge and a little higher sustained damage as dual wield;
Runeforging
What kind of runeforges should you emblazon you blade with?
Two-hand
Rune of the Fallen Crusader. Always.
Dual wield
The offhand (or main hand, idk if it matters) should be Rune of the Fallen Crusader. As for the main hand:
● Rune of Razorice - Increases Frost damage by 10% and deals 2% weapon damage as Frost damage. Id choose that.
● Rune of Swordbreaking - Reduces disarms by 60% at all times and increases parry rating by 2%. Id keep another one-handed blade emblazoned with this runeforge for the disarms.
- Seduce (Will also break this effect on use)
- Sap
- Polymorph
- Hex
- Any form of fear (Will also break this effect on use)
- Mind Control (Will also break this effect on use)
Note: Using Lichborne while bursting someone would probably save you from getting Poly/Hex/Feared or whatever. Also, using it while you are in a crowd effect might spare you a cc. Warstormp -> Hex etc.
● Death and Decay is a great ability to get drinking casters/healers in combat and so is Dark Command.
● Death Grip is also a great interrupt.
● Poisons and Nature's Grasp can't be applied through Anti-Magic Shell.
● Mind Freeze will remove Spell Reflection.
● Dark Command can proc Unholy Strength.
● Using Death Grip on a bladestorming warrior can still pull him next to you. That can help your partner survive.
● Glyph of Chains of Ice's damage portion works through hunter's Deterence.
● Very pro info:
-1 rune ability = 10 runic power;
-2 runes ability = 20 runic power;
-3 runes ability = 30 runic power;
● When kited by a pet class, use his pet to Death Strike on It if you need healing. The enemy will probably remove the pet from you after that. You can still Dark Command It and make it attack you again. Taunting pets on you might also break a cc.
● Macro Dark Command to most of your abilities to prevent casters from getting out of combat without actually pressing it. It's off GCD I beleve.
● If a dk have lots of Necrotic Strikes stacked simply immobilize the him with CoI and run away. The stacks will wear off. QQ.
● Use Outbreak before Obliterate for the bonus damage.
Runeblade
So, let's check out the weapon we can wear. Both two-hand and dual wield are pretty awsome imo, but which one is better theoretically?
● Dual wield does more melee damage. Not really like twice more but still a noticable amount.
● Dual wield has two runeforges. 10% more frost damage if you go with Razorice (like 5 points in mastery, tho it doesn't add up to the mastery itself. It increases the damage already increased by mastery).
● Dual wield goes mastery. Two-hand goes haste. It has been confirmed by gladiators and arena-junkies from posts by the time of patch 4.0.6. Both are very very close in this patch, so close that theyre almost personal choices. The reason two-hand goes haste is Might of the Frozen Wastes. Also, you will be Obliterating cloth/leather targets and mastery wont help in any way.
● Dual wield and two-hand have almost the same Killing Machine proc rate. Their weapon speed is close due to two-hand going for haste (faster hits) and dual wield for mastery (a little slower hits).
● Dual wield gets more mastery thanks to Nerves of Cold Steel. 3% hit allowes you to reforge quite the stats. The weapons themselves combined give less stats than a two-hander though.
● Two-hand gets more runic power. 50% chance pet hit but a fact. More Frost Strikes from time to time.
● Two-hand bursts a little more since the damage is one big hit instead of two small melee damages. Dual wield does more sustained.
● We can safely say that the bonus dual wield damage = the 12% strike damage from Might of the Frozen Wastes.
● Necrotic Strike as a two-hand hits twice the damage dual wield does. Reason is It's not in Treat of Thassarian.
● Dual wield is forced to drop some points for Nerves of Cold Steel. That means you ether lose Obliterate, Runic Power Mastery, Blade Barrier or anything else useful.
It's basically:
● The same KM procs;
● Around same damage;
● More runic power, harder Necrotic Strike and a little more burst as two-hand;
● More mastery, another runeforge and a little higher sustained damage as dual wield;
Runeforging
What kind of runeforges should you emblazon you blade with?
Two-hand
Rune of the Fallen Crusader. Always.
Dual wield
The offhand (or main hand, idk if it matters) should be Rune of the Fallen Crusader. As for the main hand:
● Rune of Razorice - Increases Frost damage by 10% and deals 2% weapon damage as Frost damage. Id choose that.
● Rune of Swordbreaking - Reduces disarms by 60% at all times and increases parry rating by 2%. Id keep another one-handed blade emblazoned with this runeforge for the disarms.
Talents
The talents. Ofcourse, you go deep in the Frost tree. Then you can choose between Blood and Frost subtrees. Lets check out the bonuses of speccing into Frost and It's talents.:
The talents. Ofcourse, you go deep in the Frost tree. Then you can choose between Blood and Frost subtrees. Lets check out the bonuses of speccing into Frost and It's talents.:


More peels and control.

More CC due to the 1 min Strangulate.

Leaves RPM because of the less runic power generated via dual wield.

Drop Oblit from your bars.
Scent of Blood - Very good talent, especially for dual wield. Runic power will definetly increase.
Epidemic - Dropping Virulence for Epidemic is not a bad idea tbh. Our damage does not come from diseases like unholy, so we can increase our disease duration for more Obliterates rather then reapplying Blood Plague.
Glyphs
Go with these:
Prime Glyphs
Scent of Blood - Very good talent, especially for dual wield. Runic power will definetly increase.
Epidemic - Dropping Virulence for Epidemic is not a bad idea tbh. Our damage does not come from diseases like unholy, so we can increase our disease duration for more Obliterates rather then reapplying Blood Plague.
Glyphs
Go with these:
Prime Glyphs
● Glyph of Frost Strike - Reduces the cost of your Frost Strike by 8 Runic Power.
● Glyph of Howling Blast - Your Howling Blast ability now infects targets with Frost Fever.
● Glyph of Obliterate - Increases the damage of you Obliterate ability by 20%. Use only if specced into Annihilation.
● Glyph of Death Coil - Increases the damage and healing of your Death Coil by 15%. You could use this instead of Obliterate if you have no Annihilation.
● Glyph of Icy Touch - You Frost Fever disease deals 20% increased damage. Thats the other choice for Annihilationless spec.
Major Glyphs
● Glyph of Anti-Magic Shell - Increases the duration of your Anti-Magic Shell by 2 sec.
● Glyph of Hungering Cold - Your Hungering Cold ability no longer costs runic power.
● Glyph of Dark Succor - Your Death Strike now restores at least 15% while in Unholy or Frost Presence.
Minor Glyphs
● Glyph of Horn of Winter - Your Horn of Winter lasts 1 min longer.
● Glyph of Resilient Grip - When your Death Grip Ability fails because Its target is immune, Its cooldown is reset. (Broken)
● Glyph of Deaths Embrace - Your Death Coil refunds 20 Runic Power when used to heal
● Glyph of Blood Tap - Your Blood Tap no longer deals you damage. Use in place of Resilent Grip until It's fixed.
Stat Priority, Reforging, Gemming, Enchanting and Professions
How to set your gear.
Stat priority
2H
Code:
How to set your gear.
Stat priority
2H
Code:
5% Hit rating -> 195 Spell Penetration -> Resilience/Strength -> Haste -> Mastery -> Crit -> Expertise
DW
Code:
2% Hit rating -> 195 Spell Penetration -> Resilience/Strength -> Mastery -> Haste -> Crit -> Expertise
● Hit rating - Hit rating prevents you from missing and you don't want to miss. Always reforge to hit rating, never gem for it.
● Spell penetration - The "resist" part is broken in Molten, but cap it for your Frost Strike and Howling Blast will do low damage.
● Resilience/Strength - I don't think I need to explain here. Be sure to have at least 3800 resi in full Vicious gear.
● Haste - Reduces your rune cooldown, increases your melee speed and your Killing Machine procs. Very close to Mastery for 2H, with It being better only because of Might of the Frozen Wastes.
● Mastery- Increases your Frost damage. Howling and Frost strike will pawn hard.
● Crit - We already have Killing Machine. I don't think It's that useful.
Reforging
If using a 2H you can reforge all mastery, critical strike and expertise to haste, or all haste, critical strike and expertise to mastery. TBH I tried both, both work and the difference is very small. Mastery gives you bigger crits/damage, haste gives you more melees/rp.
Dual wield reforges all haste, critical strike and expertise to mastery. The reason is that you don't have Might of the Frozen Wastes, which makes haste good for 2H anyway.
Gems
We have three types of gemming: offensively, balanced and defensively.
● Meta:
+54 Strength & 3% Increased Critical Damage;
+54 Critical Strike Rating and 1% Spell Reflect;
● Prismatic:
+40 Resilience - If you have less then 3800 resilience;
+40 Strength - If you need more strength;
● Balanced:
Red: 40 Strength (67 for Jewelcrafters);
Yellow: 40 Resilience;
Blue: 50 Spell penetration (84 for Jewelcrafters);
● Defensively
Red: 20 Strength and 20 Resilience;
Yellow: 40 Resilience (67 for Jewelcrafters);
Blue: 50 Spell penetration (84 for Jewelcrafters);
● Offensively
Red: 40 Strength (67 for Jewelcrafters);
Yellow: 20 Strength and 20 Resilience;
Blue: 50 Spell penetration (86 for Jewelcrafters);
Tip:Reaching the spell penetration cap can be achieved by 2x50 Spell Penetration gems, 20 Resilience & 20 Spell Penetration gem and Spell Piercing cloak enchant.
Tip 2:20 Strength and 20 Resilience gems don't have their recipes in the JC vendors atm. QQ.
Enchants
● Head: +60 Strength & +35 Resi
● Shoulders: +50 Strength & +25 Resi
● Cloak: +70 Spell Pen
● Chest: +40 Resil
● Bracers: +65 Haste/Major Strength
● Gloves: +50 Strength
● Belt: Eternium Belt Buckle (40 Strength in the bonus gem)
● Legs: Dragonscale Leg Armor
● Boots: +50 Hit
Professions
Jewelcrafting is quite good for death knights. All professions give good bonuses, simply choose one. The most common pair of professions is Jewelcrafting and Blacksmithing.
Rotation, Priority
Frost has a very basic priority, rotation or whatever. The things you want to do are:
● Create Death runes - 2xBlood Strike is enough;
● Use Unholy runes - Necrotic Strike/Plague Strike or maybe a Death & Decay. Plague Strike should only be used on a CoS rogue or when you want to Obliterate;
● Use the Frost Runes - Howling Blast/Icy Touch/Pillar of Frost/whatever. Icy Touch can be used when you don't want to break a CC. Pillar of Frost is your "pawnage" cd;
● Use the Death Runes - They are a bit situational. Can be used for Necrotic Striking or Howling Blasting. That depends if your target is standing next to a healer/can heal himself or not. Id use Howling Blast if the target is warrior without Enraged Regeneration, a Mage, Feral in cat form without Barkskin.
When do I Obliterate?
It depends. Do you have Annihilation + Oblit glyph? If you do the strike can be used as a good finisher. To properly use Obliterate the target should have:
● 35% or less health;
● You have Killing Machine proc;
● The target isn't wearing plate;
Pillar of Frost:
It is good to cast PoF on a Frost rune. Death rune can be used for a Necrotic Strike. PoF has two types of uses:
Code:
Offensive - Use it to burst someonel. Higher Necrotic Strike absorbs and stronger Howling Blasts;
Defensive - Use it to increase the healing of Death Coil + Lichborne;
Macros
Using macros is a must. Focus macros are one of the most important ones. They allow a player to do things to two different players without changing targets. You must have such macros for Chains of Ice, Mind Freeze, Strangilate and Death Grip. Dark Simulacrum and Outbreak can be macroed too. This macro below is example of a focus macro.
Code:
Tip 2:20 Strength and 20 Resilience gems don't have their recipes in the JC vendors atm. QQ.
Enchants
● Head: +60 Strength & +35 Resi
● Shoulders: +50 Strength & +25 Resi
● Cloak: +70 Spell Pen
● Chest: +40 Resil
● Bracers: +65 Haste/Major Strength
● Gloves: +50 Strength
● Belt: Eternium Belt Buckle (40 Strength in the bonus gem)
● Legs: Dragonscale Leg Armor
● Boots: +50 Hit
Professions
Jewelcrafting is quite good for death knights. All professions give good bonuses, simply choose one. The most common pair of professions is Jewelcrafting and Blacksmithing.
Rotation, Priority
Frost has a very basic priority, rotation or whatever. The things you want to do are:
● Create Death runes - 2xBlood Strike is enough;
● Use Unholy runes - Necrotic Strike/Plague Strike or maybe a Death & Decay. Plague Strike should only be used on a CoS rogue or when you want to Obliterate;
● Use the Frost Runes - Howling Blast/Icy Touch/Pillar of Frost/whatever. Icy Touch can be used when you don't want to break a CC. Pillar of Frost is your "pawnage" cd;
● Use the Death Runes - They are a bit situational. Can be used for Necrotic Striking or Howling Blasting. That depends if your target is standing next to a healer/can heal himself or not. Id use Howling Blast if the target is warrior without Enraged Regeneration, a Mage, Feral in cat form without Barkskin.
When do I Obliterate?
It depends. Do you have Annihilation + Oblit glyph? If you do the strike can be used as a good finisher. To properly use Obliterate the target should have:
● 35% or less health;
● You have Killing Machine proc;
● The target isn't wearing plate;
Pillar of Frost:
It is good to cast PoF on a Frost rune. Death rune can be used for a Necrotic Strike. PoF has two types of uses:
Code:
Offensive - Use it to burst someonel. Higher Necrotic Strike absorbs and stronger Howling Blasts;
Defensive - Use it to increase the healing of Death Coil + Lichborne;
Macros
Using macros is a must. Focus macros are one of the most important ones. They allow a player to do things to two different players without changing targets. You must have such macros for Chains of Ice, Mind Freeze, Strangilate and Death Grip. Dark Simulacrum and Outbreak can be macroed too. This macro below is example of a focus macro.
Code:
#show Chains of Ice
/cast [target=focus] Chains of Ice
Lichborne selfheal macro:
Code:
#showtooltip Lichborne
/cast !lichborne
/cast [@player] Death Coil
A macro to cancel Lichborne when you see a priest or a paladin casting anti-undead spell:
Code:
/cancelaura Lichborne
A macro to remove immunities stolen by Dark Simulacrum:
Code:
/cancelaura Divine Shield
/cancelaura Ice Block
/cancelaura Hand of Protection
A good thing is macroing focus cast Dark Command to your main strikes. It prevents your focus targets from leaving combat. It's good to write /startattack in any ability for easy switches. Here is one such macro:
Code:
#showtooltip obliterate
/startattack
/cast obliterate
/cast [@focus] dark command
A macro activating your vicious/bloodthursty trinket and your Pillar of Frost. 13 is the upper trinket slot, 14 is the second lower one. The macro:
Code:
#showtooltip Pillar of Frost
/cast Pillar of Frost
/cast 13
Focus Chains of Ice + Death Grip by Skarthis
Code:
#showtooltip Death Grip
/castsequence [target=focus] reset=25 Death Grip, Chains of Ice
Here is one mouseover macro posted by RicardoMP:
Code:
/cast [@museover, harm, nodead] [@focus, harm , nodead] [@target, harm, nodead] Death Grip
Here is a simple version of it:
Code:
/cast [@museover, harm, nodead] Death Grip
It basicly Death Grips the target you are pointing with your mouse. Ricardos macro is a bit different.
Prime objective is your mouseover, but if dead or friendly, it cast it in your focus, it the focus isn´t a valid target, it cast it in your target.
I havent really tried such macros except mouseover pet attack when I was Unholy. Use them if you wish, change Death Grip to any other ability.
Dark Simulacrum
A very rolfpawnage spell. Both fun and useful. Dark Simulacrum stals all kind of spells except physical abilities (Crusader Strike). Pet abilities can be copied, but pet summons can't. The copied spells are always casted instantly and have cooldown. The most useful spells to copy are:
● Mage - Polymorph, Blink, Ice Block;
● Warlock - Fear, Death Coil, Howl of Terror;
● Shaman - Hex;
● Druid - Cyclone, Root;
● Priest - Fear, Psychic Horror;
● Paladin - Hammer of Justice, Avenging Wrath, Divine Shield, Hand of Freedom, Divine Protection;
You want to steal mainly cc abilities. Stealing some heals isn't bad if you or your partner really need them.
Addons
Addons improve your gameplay. Most of them are a preferrence. Gladius is a must imo.
● Gladius
What is Gladius? - Gladius adds enemy unit frames to arenas for easier targeting and focusing. It is highly configurable and you can disable most features of this addon.
URL: http://www.curse.com/addons/wow/gladius
● OmniCC
What is OmniCC? - OmniCC is an addon that adds text to items, spell and abilities that are on cooldown to indicate when they will be ready to use. In other words: it turns all the standard analogue cooldowns into digital ones.
URL: http://www.curse.com/addons/wow/omni-cc
● Necrotic Track
What is Necrotic Track? - NecroticTrack tracks Necrotic Strike absorption amount and time on various units. This is not only useful for Death Knights since the Target module works for friendly units as well and the Player module tracks the amount on yourself.
URL: http://www.curse.com/addons/wow/necrotictrack
● Engraved
What is Engraved? - Engraved is a compact rune display for Death Knights. Runes icons glow when they are ready to be used and partially glow when they are almost ready (less than one global cooldown away, for example). Rune display can be prioritized so that, for runes of the same type, the one with the shortest remaining cooldown is always shown in the same on-screen position. Runes are individually moveable and sizeable.
URL: http://www.curse.com/addons/wow/engraved
● Dominos
What is Dominos? - Dominos is a full ActionBar replacement mod. It provides you with all the features needed to fully customization most aspects of your action and related bars.
URL: http://www.curse.com/addons/wow/dominos
● Bartender4
What is Bartender4? - Bartender4 is an addon simular to Dominos. It customizes your action bar.
URL: http://www.curse.com/addons/wow/bartender4
● Power Auras Classic
What is Power Auras Classic? - Power Auras Classic is an addon created to provide visual cues (auras) when you gain buffs, debuffs and many more. Very useful for shorts buffs or debuffs, it allows you to draw in the center of the screen, or around your character, very customizable visual effects, rather than having to look at or mouseover buff/debuff icons/actionbars.
URL: http://www.curse.com/addons/wow/powerauras-classic
● Snowfall Keypress
What is Snowfall Keypress? - Snowfall Keypress is an addon that makes your abilities activate when you press the button instead of when you release it. The time difference is very very small, but any bonus time you can get is good. Use it! Btw, the 3.3.5 version works perfectly on Cataclysm.
URL: http://www.wowinterface.com/download...lKeyPress.html
2/05/2013
When we start out in this guide there's obviously going to be a difference in the beginning for Alliance and Horde for this guide because each faction starts in different areas until after a certain level when they freely roam through the same zones. I could tell you the best routes to choose but for this guide I think it better I show you some pics of the routes people made in pictures. Also don't forget to go back to your trainer as often as you can so you can keep advancing farther in [Mining].I strongly recommend that you [Smelt] through this step, even if you don't have the gold to buy the ore this guide makes it easy for you to get it. Cause who really want to go out and hunt for all those Veins I know I don't but if you have to here is the guide for you to use.
Note: This guide can be used though all the realms of Molten-WoW. It is just some realms my level your skill in [Mining] up fast those realms are Frostwolf/Deathwing/Neltharion/Sargeras/Ragnaros. So please follow this guide and you should have no issues.
Ore Skill Requirements
To help players out if they are new to [Mining] it is a list of all the ores and what level you can mine them on. Every ore in this part is used in this guide.
----------------------
Ore Required Level
----------------------
Copper Vein-1
----------------------
Tin Vein-65
----------------------
Bronze-65
Smelted, not mined
----------------------
Silver Vein-75
----------------------
Iron Deposit-125
----------------------
Gold Vein-155
----------------------
Steel-165
Smelted, not mined
----------------------
Mithril Deposit-175
----------------------
Truesilver Deposit-205
----------------------
Dark Iron Deposit-230
----------------------
Small Thorium Vein-230
----------------------
Rich Thorium Vein-255
----------------------
Fel Iron Deposit-275
----------------------
Adamantite Deposit-325
----------------------
Rich Adamantite Deposit-350
----------------------
Cobalt Deposit-350
----------------------
Khorium Vein-375
----------------------
Rich Cobalt Deposit-375
----------------------
Saronite Deposit-400
----------------------
Rich Saronite Deposit-425
----------------------
Titanium Vein-450
----------------------
Mining 1 to 65 - [Copper Veins]
First off go to any major city and train form any [Mining] trainer you find and learn the [Apprentice Mining] skill. This should cost you only 10 Copper.
Horde Part:
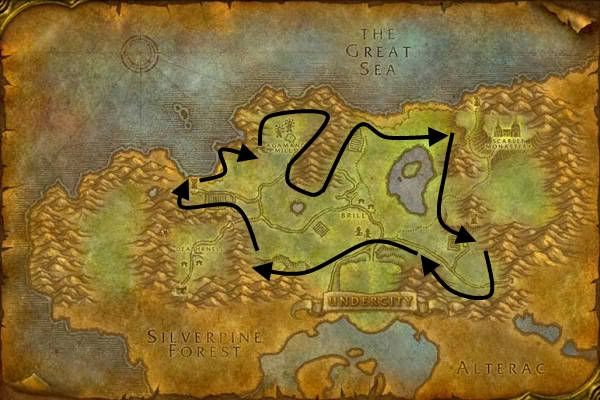
Undead - Tirisfal Glades: The Undead [Mining] route is fairly simple. You can just go and pick up a starting point any were on the route and then just follow the path around the map. If you are a low level you my want to watch out for areas in the map that are to high for you to go to yet. If that is the case then just skip that part of the map and pick up on the path in lower level areas. You will find [Copper Ore] all along this route. Some in more spots in others.
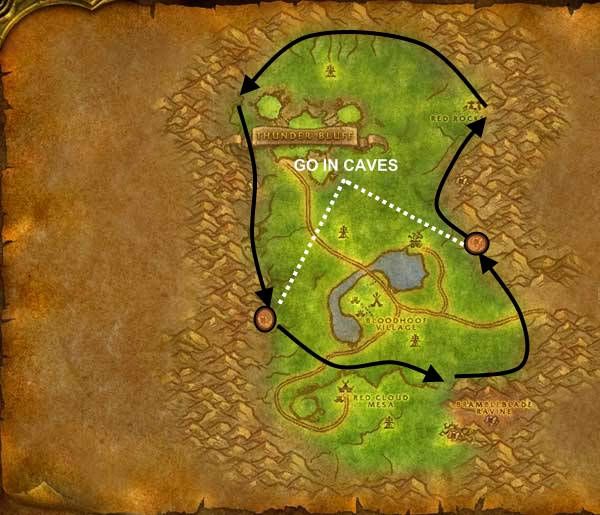
Tauren - Mulgore: Mulgore is just one big oval so the [Mining] route for in here is fairly simple. On this map mob levels and aggro is not very impotent here since you will just be sticking to the outer edges of the map. You may want to skip the leveling in Venture Co. Mine if you are to low of a level and can't handle the mobs. You will find [Copper Ore] all along this route..
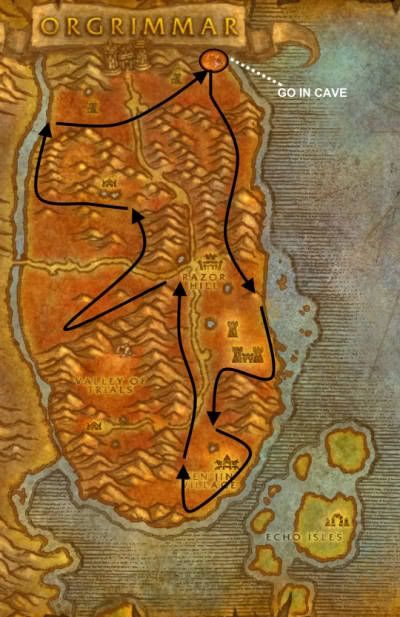
Orc & Troll - Durotar: This [Mining] route is shorter then the route above but it dose the same good job for leveling. Durotar is full of mountains and if you wanted to you could probably spend some time developing your own [Mining] route if this one dose not work for you. As you will notice though the [Mining] routes in this guide are nice and simple to follow. If you don't follow this picture you will have to go running around all the map to find your way around. You will find [Copper Ore] all along this route.
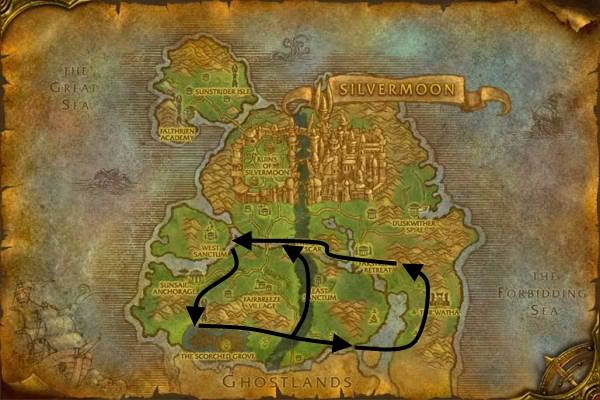
Blood Elves - Eversong Woods: This route is by far the easiest of all the [Mining] routes above. Just follow the outer circle on the map to get the most veins out of here. The Dead Scar however is loaded with veins so if you want to this pictures shows another path to take to get the most form the Dead Scar. You will find [Copper Ore] all along this route.
Alliance Part:
Human - Elwynn Forest: This is another fairly simple [Mining] route. All you need to do is follow this route and go in both caves to get the most out of the route. Don't forget to not go past the river on the south side or you will go into a new zone. You will find [Copper Ore] all along this route.
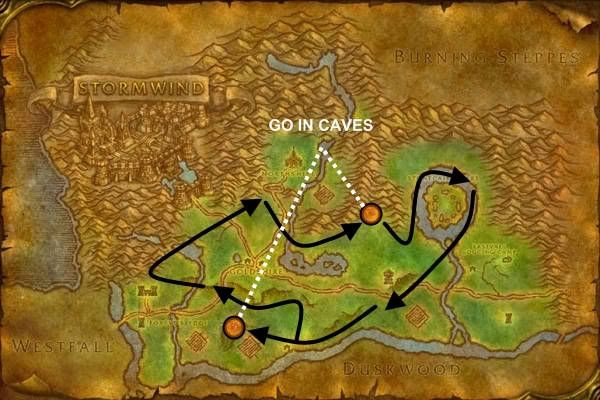
Night Elves - Darkshore: Darnassus doesn't have allot of veins in it so you will have to come to Darkshore to get the most out of it if your Night Elves. Now Darkshore is pretty huge so in this map it will show you two really good [Mining] routes you can take so you don't have to go though the whole map. Remember to go in the caves the most veins in there. You will find [Copper Ore] all along this route.
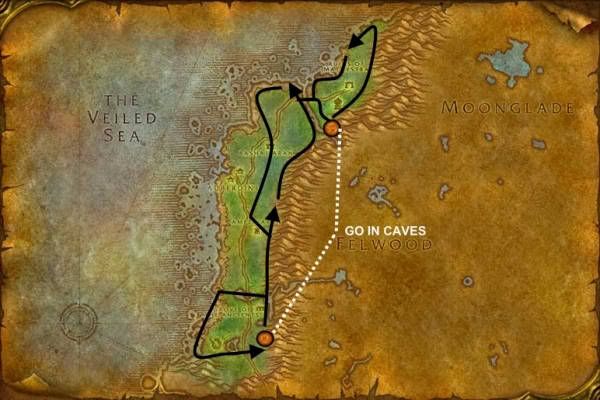
Draenei - Azuremyst isle: There are two caves in this [Mining] route that you want to hit up. If you are low enough level to get experience form the cave to the north. Cause then you can kill mobs while you get ore so you can Grind/Mine at the same time. If nto then just follow the entire route around the map. There's kind of a dead spot transition while going to the next good area when you go passed the lakes but it's that or loop back the way you came, either is fine. You will find [Copper Ore] all along this route.
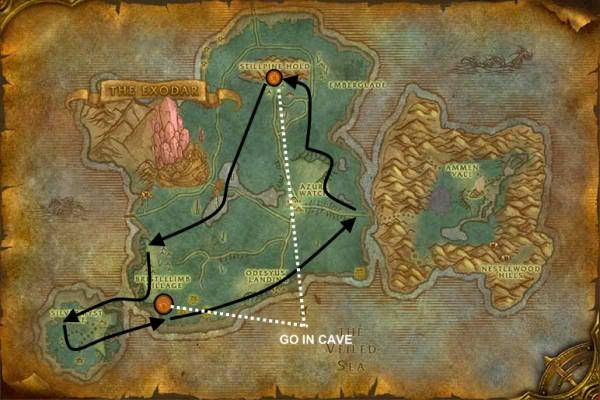
Note: At 50 you will want to go back to any Major City and learn [Journeyman Mining] if you haven't done so already.
Mining 66-125 - [Tin Veins] and [Silver Veins]:
Horde and Alliance:
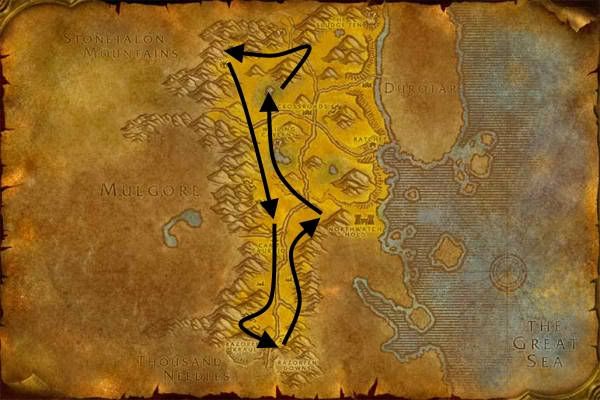
The Barrens: Once again if you decided to not smelt through these beginning levels of the mining guide you can do these mining routes as horde or alliance. For this [Mining] route I want you to follow the path around the map. If you need to run to the southern ends of the barrens be prepared to have to attack level 25 easy. If you cant then just follow the path without going that far down. On this Path you will find allot of [Tin Ore] and some [Silver Ore].
Wetlands:The Wetlands [Mining] route is mainly focused in the two caves in wetlands. It is were you will find the most veins. Other then the caves follow the path around the map to find more veins. On this Path you will find allot of [Tin Ore] and some [Silver Ore].
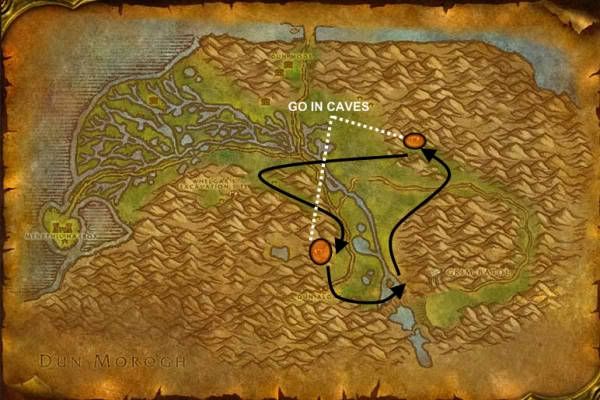
Note: In addition to these mining routes above you could also perform full circuits of Wetlands, Ashenvale, and Redridge mountains for this part of the mining guide.
Mining 126-175 - [Iron Deposit] and [Gold Vein]:
Horde and Alliance:
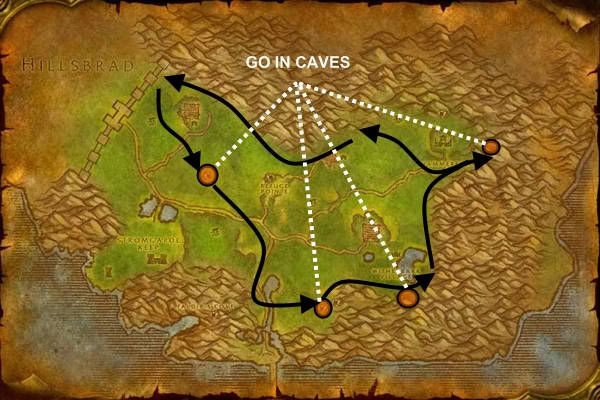
Arathi Highlands: There are allot of caves you will want to go and explore on this map. If you are the right level to go in them. In this [Mining] route you can see it is fairly simple to follow that path lead out. If you are horde you can follow the path around Hammerfall if you wish. You will find [Iron Ore] and some [Gold Ore] on this path.
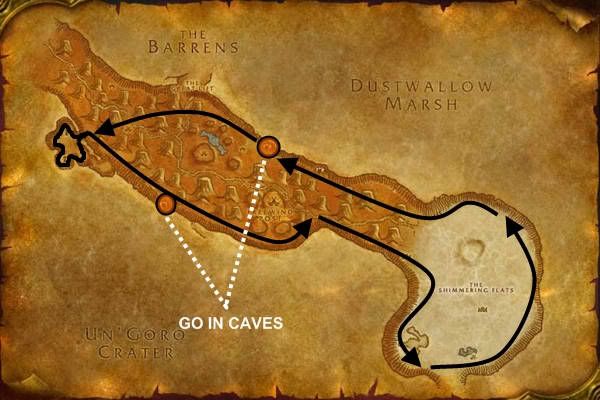
Thousand Needles: There are only two caves on this [Mining] route that you can go explore in. Alos as you can tell the path is kinda of large but just follow this path and you should have np on this [Mining] route. You will find [Iron Ore] and some [Gold Ore] on this path.
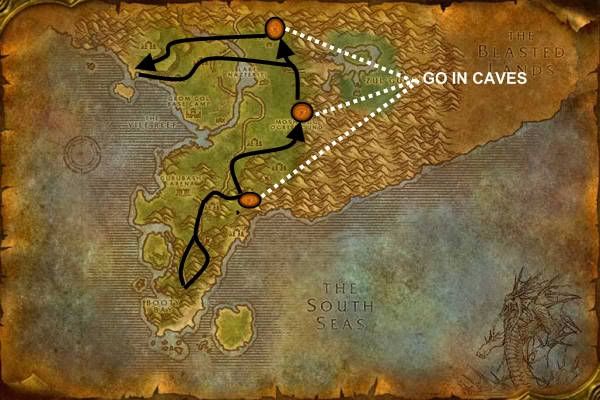
Stranglethorn Vale: On this [Mining] route there are three caves that you can go in to get the veins. This is a really fun [Mining] route though cause the mobs levels are so high you can pretty much go around and Grind/Mine at the same time unless you don't wish to do that then you my not want to go on this route. You will find [Iron Ore] and some [Gold Ore] on this path.
Note: When you hit 150 go back to any major city to learn [Expert Mining] if you haven't done that already.
Mining 176-230 - [Mithril Deposit] and [Truesilver Deposit]:
Horde and Alliance:
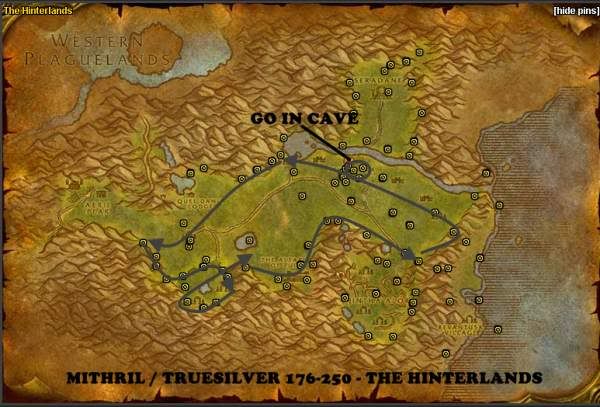
The Hinterlands: On this [Mining] route there is only one cave and the route seems kinda of small. I have heard this is a really good route though. You will find [Mithril Ore] and [Truesilver Ore] all along this route.
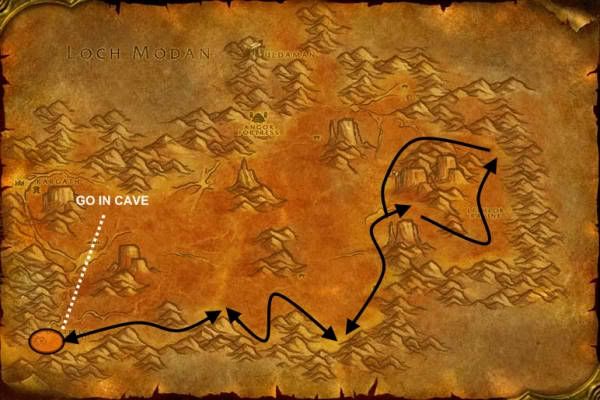
Badlands: On this [Mining] route you will want to spend most of your time in the eastern loop or in the cave in the south. It's not bad to alternate between the two spots but the eastern loop and southwestern cave are where you will level mining the fastest. You will find [Mithril Ore] and [Truesilver Ore] all along this route.
Tanaris: This [Mining] route is were your going to want to spend most your time though these levels. Now you should go explore the two caves in this [Mining] route they provide very good leveling. Yes this is a very big route but it is worth it for those levels you need.
Note: At level 200 go back to any major city and learn [Mining Artisan].
Mining 231-275 - [Thorium Veins]
Horde and Alliance:
UnGoro Crater: This [Mining] route is one of the most competitive in the game. It has one cave to it and I would suggest going down the Slithering Scar for some extra leveling. You will find [Thorium Ore] all along this [Mining] route.
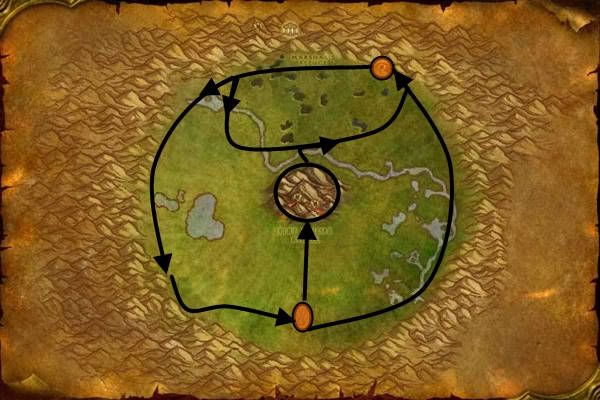
Winterspring: This is one of the best zones for [Thorium Veins]. The caves to the north on the map go into a very large tunnel system and allot of [Thorium Veins] spawn there. The bottom of the map mark in green is full of level 60s Elite Mobs nothing but them there. There is a good amount of [Thorium Veins] down there but you must be high enough level to get to them. You will find [Thorium Ore] all along this [Mining] route.
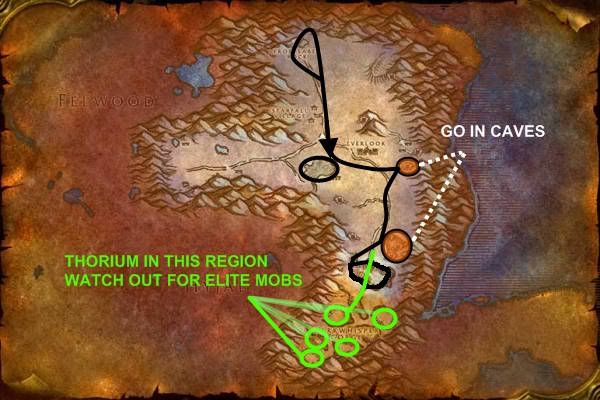
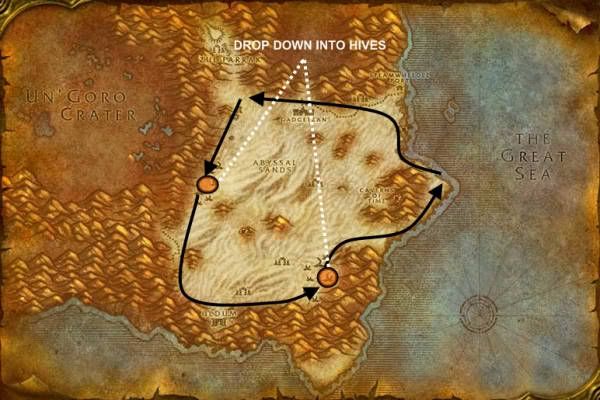
Silithus: This is another very good location to mine [Thorium Ore]. On this [Mining] The areas you see mark in orange are hive areas. Hive areas are a complex system of tunnels going into the earth there is allot of [Thorium Veins] down in these. If you do not wish to go into the tunnels then you can still find a good amount of [Thorium Veins] along this route. You will find [Thorium Ore] all along this mining route.
Note: At 275 you want to go back to any major city and learn [Mining Master]
Mining 276-325 - [Fel Iron Deposit]
Horde and Alliance:
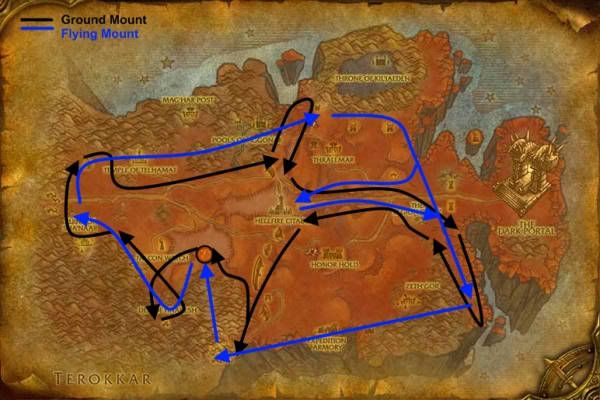
Hellfire Peninsula: This is the easiest [Mining] route to find [Fel Iron Deposit] on this map. You can just loop around the orcs near the citadel but if you do follow the whole route. It will be beneficial to your leveling. Look out for the Elite area in the northwest areas of the map. Remember Fel Iron can be skilled up all the way to 375+ if you wish and you can skip the other sections of this leveling guide. You will find [Fel Iron Ore all along this route.
Mining 326-350 - [Adamantite Deposit]
Horde and Alliance:
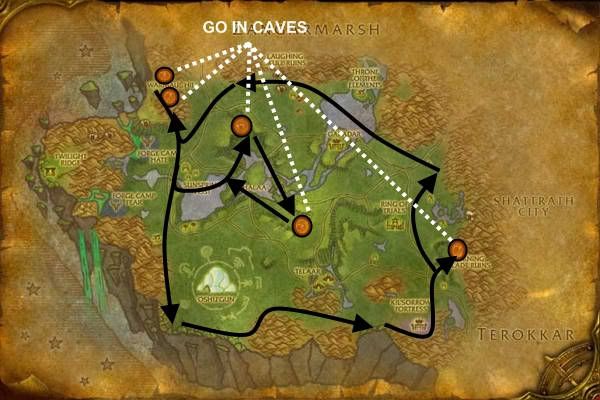
Nagrand: Form 326-350 continue [Mining] [Fel Iron Deposit] when it is possible but begin to look for [Adamantite Deposit] on this map. You can almost find [Adamantite Deposit] anywere on this route so look carefully and level fast. You will find [Adamantite Ore] on this route.
Mining 351-450 [Cobalt Deposit] / [Rich Cobalt Deposit]
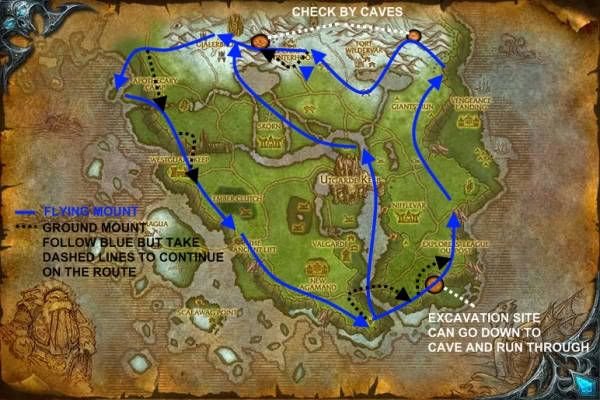
Howling Fjord: You must be at least 350 to start [Mining] [Cobalt Ore]. The [Rich Cobalt Deposit] you must be 375 to mine form. You can mine [Rich Cobalt Deposit] all the way to 450 if you wish but there will be more zones posted. Just follow the route and go into the two caves on the map to look for the veins you need. You will find [Cobalt Ore] all along this route.
Alternative Smelting Guide 1-450
For leveling most of 1-375 in this guide you can Smelt your way to the top instead of actually having to go out and mine the ore yourself. If you wish to choose this method I have a little Alternative Smelting Guide for you to look at and smelt your way to the top. It will level you up allot faster.
----------------------
Level SmeltOrange/Yellow/Green/Grey
----------------------
1-70/Copper Bar x1,25,47,70
----------------------
65-75/Tin Bar x,65,70,75
----------------------
65-115/Bronze Bar x,65,90,115
----------------------
75-130/Silver Bar x75,115,122,130
----------------------
125-160/Iron Bar x125,130,145,160
----------------------
155-185/Gold Bar x155,170,177,185
----------------------
175-230/Mithril Bar x175,202,230
----------------------
230-290/Truesilver Bar x230,250,270,290
----------------------
230-290/Thorium Bar x230,250,270,290
----------------------
275-325/Fel Iron Bar x,275,300,325
----------------------
325-340/Adamantite Bar x,325,332,340
----------------------
350-375/Cobalt Bar x,350,362,375
----------------------
1/27/2013
Mining is used to collect the ores you’ll need for Blacksmithing, Jewelcrafting, and Engineering…this means that the Auction House is usually LOADED with ALL the Mining supplies you’d ever need for leveling.


So instead of wasting the time running around leveling your Mining you may want to just BUY everything. If you don’t think you can afford it then you should read this guide now before you start.
This Mining Leveling Guide is updated for patch 4.3 and Cataclysm.
This guide will help you level Mining from 1 to 525 by both gathering ore and smelting it. You’ll be able to save time and gold reaching 525 as fast as possible. This guide also includes some of the best farming routes available for Mining.
* What’s in this Guide:
Horde 1-65
Alliance 1-65
66-125
126-175
176-230
231-275
276-325
326-350
351-375
376-400
401-450
450-475
475-525
Smelting 1-525
It is highly advised that if you get stuck on a Mining route in this guide, have problems finding nodes due to over crowding of zones, or want to be lazy, you should smelt as much as you can for parts of this Mining leveling guide.
* Ore Skill Requirements
Here is a list of what skill levels you will need to mine each type of ore found in this guide.
OreRequired Level
Copper Vein1
Tin Vein50
Bronze50Smelted, not mined
Silver Vein75
Iron Deposit125
Gold Vein155
Steel125Smelted, not mined
Mithril Deposit175
Truesilver Deposit205
Dark Iron Deposit230
Small Thorium Vein230
Rich Thorium Vein255
Fel Iron Deposit275
Adamantite Deposit325
Felsteel350Smelted, not mined
Rich Adamantite Deposit350
Cobalt Deposit350
Khorium Vein375
Rich Cobalt Deposit375
Saronite Deposit400
Rich Saronite Deposit425
Obsidium Deposit425
Pure Saronite Deposit450
Rich Obsidium Deposit450
Titanium Vein450
Elementium Vein475
Rich Elementium Vein500
Pyrite Deposit525
Rich Pyrite Deposit525
Don’t forget to go back to the mining trainer at the appropriate times so that you can advance your mining skill to each new maximum.
I strongly recommend that you smelt as much as you can for this guide, especially through the lower levels, if you don’t have the gold to buy the ore required to do this take a look at this Gold Making Guide.
The lower level ores you’ll be mining in the first several sections don’t have the best resale value and you can save a lot of time by simply buying them on the Auction House instead so skip to the smelting section if possible.
* Mining 1 to 65 – Copper
- Horde
Undead – Tirisfal Glades – The undead path for this mining leveling guide is fairly simple. You can pick a starting point anywhere on the line and just run the path mining along the way. If you are low level you may want to take into consideration areas on the map that might be too high for you to cross, if that is the case then just skip them and meet up with the path further down while leveling your mining.

Tauren – Mulgore – Mulgore is just a big oval so this mining route is really simple to run while leveling. Mob levels and aggro are not that important of a factor since you’ll be sticking to the outer edges of the map you should be fine following this part guide. You may want to skip leveling mining in the Venture Co Mine if you are too low of a level.

Orc & Troll – Durotar - Durotar is full of mountains and you could probably develop your own mining route if this one doesn’t work for you. I will let you know upfront that Durotar is a deformed piece of land and you would have to run all over the place to utilize a full mining circuit of it which can be tedious while leveling.

Blood Elves – Eversong Woods – This route is the simplest route to follow. There are other mines near West Sanctum and West of Sunsail Anchorage but if you’re looking for simplicity this is the route to take. The Deadscar is loaded with mines so if you get bored of going in circles I’ve added a point you can break off at halfway through.

Goblins – Azshara – Goblins have several options of where to go to mine, Azshara is one of them and can be done for some of the other Horde races as well by choice. The route stays up on the plateau and does a full loop around it. The red circle on the map is where you can make out like a bandit on copper ore as there are at least 7 nodes in that area that will spawn.

- Alliance
Human – Elwynn Forest – This mining path is for this part of the guide is kind of obvious since Elwynn forest isn’t surrounded by mountains on all 4 sides. There are two caves to go into and if you run the alternate dotted line from time to time there are more nodes down the river near the Tower of Azora.

Night Elves & Worgen – Darkshore – Darnassus isn’t great for mining so you have to come to Darkshore to level it up. Darkshore is a huge zone, there are nodes scattered all off to each side of this route. The southern half is higher level range so do half circles of the route if that is an issue.

Dwarves & Gnomes – Dun Morogh – This is a route I’ve used many times for leveling up my mining. You can literally make your own mining leveling route in this zone because it is so mountainous. Just stick to the mountain edges, caves, and rises in land and you’ll be set to mine in this zone as shown in the zone mining map guide below.

Draenei – Azuremyst Isle – There are two caves on this route that you’ll want to hit up. If you are low enough level to get experience in the cave to the north you could basically just sit in there and grind / mine at the same time. If not then follow the entire route. There’s kind of a dead spot transition while going to the next good area when you go passed the lakes but it’s that or loop back the way you came, either is fine.

* Mining 66-125 – Tin and Silver
- Horde and Alliance
Hillsbrad Foothills - This zone, which was combined with Alterac Mountains in Cataclysm, now has one of the densest areas of Tin Ore ever noted on any map. By staying in the red zone and going in the caves there are a very large supply of nodes. Take a trip out of the area and run around the outskirts of the mountains when bored.

Ashenvale - This route is more spread apart than the above Hillsbrad route, but still a viable option for Tin Ore. Stay away from the northeast section as it’s mostly Copper Ore up there. Stick to the internal ridges.

In addition to these mining routes above you could also perform full circuits of Wetlands and Redridge mountains for this part of the mining guide.
* Mining 126-175 – Iron and Gold
- Horde and Alliance
Don’t forget to go back to the mining trainer so that you can continue leveling up, there’s nothing worse than mining and mining only to realize you haven’t been getting skill ups because you didn’t train and were zoned out.
If you are starting to run low on gold or are getting tired of mining and would like to have enough gold to smelt as much as possible from this point on I highly recommend you look at these gold making tips.
Feralas - This zone is loaded with Iron Ore and is probably the best zone to get it now thanks to changes to the zone from Cataclysm. Do a loop in the north and run some of the outskirts in the southern regions west of Camp Mojache.

Western Plaguelands - In this zone you’ll find a relatively simple and easy route to follow. Just doing an outskirt circuit of the map without going too far north or doing anything internally should be a pretty sufficient route to net enough Iron Ore on each trip around.

The Cape of Stranglethorn – This is my least favorite spot of the three to mine Iron Ore but it’s likely one of the best to find this ore. There are a few nodes out on Jaguero Isle and then by coming back across to the gorilla area and naga area you will net some Iron Ore.

* Mining 176-230 – Mithril and Truesilver
You could still be smelting for this part and skipping the first half of this mining leveling guide, but it will start to cost a lot more gold and you should absolutely read this guide if you decide to smelt. Don’t forget to go back to the mining trainer at 225 so you can continue advancing your skill.
Felwood – This is probably the easiest route to follow as long as you don’t mind running through a lot of enemies while doing it. This route should net you the most Mithril Ore, and is almost a complete loop of the outskirts of the zone.

Badlands – Here you’ll probably want to spend most of your time in the eastern loop or in the cave in the southwest. It’s not bad to alternate between the two spots but the eastern loop and southwestern cave are where you will level mining the fastest.

Burning Steppes – Dreadmaul Rock is loaded with caves full of Mithril Ore, you could spend all day just going in and out of the caves on the red spot but you’ll have to be dismounted most of the time and fight your way through some of the enemies. For a more peaceful route take the outskirt arrows.

11/30/2012
First, visit any trainer in the main cities of old Azeroth - just ask a guard, and learn Apprentice Engineering. Northrend trainers can also teach you every recipe from 1 to 450.
1 - 30
40 x [Rough Blasting Powder] - 40 Rough Stone
This recipe goes yellow at 20, so get enough materials to use this recipe 40 times.
30 - 50
34 x [Handful of Copper Bolts] - 34 Copper Bar
You will need 34 of these later.
50 - 125
Visit your trainer, and learn Journeyman Engineering.
50 - 51
1 x [Arclight Spanner] - 6 Copper Bar
51 - 75
24 x [Copper Tube] - 48 Copper bar, 24 Weak Flux
75 - 85
15 x [Coarse Blasting Powder] - 15 Coarse Stone
You will need 15 of these later.
85 - 90
5 x [Coarse Dynamite] - 15 Coarse Blasting Powder, 5 Linen Cloth
90 -100
12 x [Copper Modulator] - 24 Handful Copper Bolts, 12 Copper Bar, 24 Linen Cloth
100 -105
5 x [Practice Lock] - 10 Handful Copper Bolts, 5 Bronze Bar, 5 Weak flux
105 -120
17 x [Bronze Tubes] - 34 Bronze Bar, 17 Weak Flux
120 -125
5 x [Standard Scope] - 5 Bronze Tube, 5 Moss Agate
125 - 205
Visit your trainer, and learn Expert Engineering.
125 -150
40 x [Heavy Blasting Powder] - 40 Heavy Stone
and
20 x [Whirring Bronze Gizmo] - 40 Bronze Bar, 20 Wool Cloth
You will need 40 [Heavy Blasting Powder] and 20 [Whirring Bronze Gizmo] later, and if you make these you should reach 150 skill point.
150 - 155
20 x [Bronze Framework] - 40 Bronze Bar, 20 Medium Leather, 20 Wool Cloth
by making them now, you might get a lot further - probably towards 160, then stop making these and only make more when you'll need them.
155 -175
20 x [Explosive Sheep] - 40 Heavy Blasting Powder, 20 Whirring Bronze Gizmo, 20 Bronze Framework, 40 Wool Cloth
175 - 176
The recipe will be yellow, so you might not gain any skill up, but you will need this item later. You will have to make only one of this, don't make more if you don't gain skill up.
1 x [Gyromatic Micro-Adjustor] - 4 Steel Bar
176 - 195
90 x [Solid Blasting Powder] - 180 Solid Stone
Extremely cheap! On my realm it costs 1 gold/stack. Save some of these, because you will need it later.
195 - 200
7 x [Mithril Tubes] - 21 Mithril Bar
205 - 280
Visit your trainer and learn Artisan Engineering.
Engineering has the option at skill level 200 to specialize in Gnomish or Goblin Engineering. The main difference between both sides is the location of their respective teleporters and the ability of their trinkets. Some items require a specific specialization to use, while other items are crafted by one specialization but are usable by any engineer. Fortunately, most recipes that are crafted by one Specialization can be worn by both.
Gnomish Engineering
List of Recipes
Goblin Engineering
list of recipes
200 - 210
12 x [Unstable Triggers] 12 Mithril Bar, 12 Mageweave Cloth, 12 Solid Blasting Powder
Save these.
210 - 225
17 x [Hi-Impact Mithril Slugs] - 17 Mithril Bar, 17 Solid Blasting Powder
225 - 235
20 x [Mithril Casings] - 60 Mithril Bar
Save these.
235 - 245
10 x [Hi-Explosive Bomb] - 20 Mithril Casings, 10 Unstable Trigger, 20 Solid Blasting Powder
245 - 250
7 x [Mithril Gyro-Shot] - 14 Mithril Bar, 14 Solid Blasting Powder
250 - 260
20 x [Dense Blasting Powder] - 40 Dense Stone
Save these and if you don't reach 260 by making these, make a few more [Mithril Gyro-Shot].
260 - 280
20 x [Thorium Widget] - 60 Thorium Bar, 20 Runecloth
280 - 350
Go to Outland or Northrend,visit your trainer, and learn Master Engineering
.
280 - 285
5 x [Thorium Tube] - 30 Thorium Bar
285 - 300
20 x [Thorium Shells] - 40 Thorium Bar, 20 Dense Blasting Powder
300 - 310
50 x [Handful of Fel Iron Bolts] - 50 Fel Iron Bar
310-320
If you don't reach 320 by making the recipes below, you should make [Fel Iron Bombs] until 320. But then you also need to make a few more Fel Iron Bolts and the other materials.
10 x [4 Elemental Blasting Powder] - 20 Mote of Earth, 10 Mote of Fire
Save these.
15 x [Fel Iron Casing] - 45 Fel Iron Bar
You will need around 15 of these later, but I suggest you to make these until it goes grey, then only make more when you'll need them.
320 - 325
5 x [Fel Iron Musket] - 5 Heavy Stock, 15 Fel Iron Casing, 30 Handful of Fel Iron Bolts
325 - 335
10 x [Adamantite Grenade] 40 Adamantite Bar, 10 Elemental Blasting Powder, 20 Handful of Fel Iron Bolts
335 - 350
30 x [White Smoke Flare] - 30 Netherweave Cloth, 30 Elemental Blasting Powder
Recipe location
350 - 450
Go to Northrend, visit your trainer and learn Grand Master Engineering.
350 - 370
You will need around 50 [Handful of Cobalt Bolts] and 36 [Volatile Blasting Trigger] later. Make these now, and you should reach 375 or probably more. Note that when you craft [Handful of Cobalt Bolts] you can get 1 or 3 bolts, and the same goes for [Volatile Blasting Trigger], you will get 2 [Volatile Blasting Trigger] each craft.
35 x [1-3 Handful of Cobalt Bolts] - 70 Cobalt Bar
370 - 377
Save these.
18 x [2 Volatile Blasting Trigger] - 54 Cobalt Bar, 18 Crystallized Water
377 - 385
Save these too, you will need them.
10 x [Overcharged Capacitor] - 40 Cobalt Bar, 10 Crystallized Earth
385 - 390
8 x [Explosive Decoy] - 8 Frostweave Cloth, 24 Volatile Blasting Trigger
390 - 400
Save these too, you will need them later.
You will probably reach more than 400, then stop making these and make more only if you need it.
15 x [Froststeel Tube] - 120 Cobalt Bar, 15 Crystallized Water
400 - 405
5 x [Diamond-cut Refractor Scope] - 5 Froststeel Tube, 10 Handful of Cobalt Bolts
405 - 410
5 x [Box of Bombs] - 25 Saronite Bar, 5 Volatile Blasting Trigge
410 - 415
15 x [Mammoth Cutters] - 15 Saronite Bar, 15 Volatile Blasting Trigger
415 - 425
25 x [Saronite Razorheads] - 50 Saronite Bar
425 - 430
Make [Global Thermal Sapper Charge] between 425-435, if you are a Goblin Engineer.
7 x [Mechanized Snow Goggles] - 56 Saronite Bar, 14 Borean Leather, 7 Eternal Shadow
430 - 435
5 x [Noise Machine] - 10 Froststeel Tube, 10 Overcharged Capacitor, 40 Handful of Cobalt Bolts
435 - 449
When you reach 435, you can make your [Wormhole Generator: Northrend] and your epic Engineering Helm at 440, however if you want to level your Engineering past 440, you should wait with both until 448, because there are only green recipes at that point, but the Goggles and the [Wormhole Generator: Northrend] are still orange.
You will probably need to make more than 25 of these.
25 x [Gnomish Army Knife] - 250 Saronite Bar, 25 Skinning Knife, 25 Minning Pick, 25 Blacksmithing Hammer
449 - 450
1 x [Wormhole Generator: Northrend] - 8 Titanium Bar, 2 Eternal Fire, 2 Eternal Shadow, 2 Eternal Water, 2 Eternal Air
I hope you liked this Engineering leveling guide, GZ to 450!
Source: http://www.wowhead.com/forums&topic=160512/wow-engineering-guide-1-450
Subscribe to:
Posts (Atom)


Popular Posts
-
When we start out in this guide there's obviously going to be a difference in the beginning for Alliance and Horde for this guide becau...
-
Hello everyone and welcome to yet another one of my guides in this one we will help you so you know were to go to get herbing up the fastest...
-
 Contents: 1. Stat caps 2. Early Combat spec and play style 3. Late Combat spec and play style 4. BiS list 5. Enchants 6. FAQ ...
 -
AckisRecipeList - A LDB plugin which provides a menu of your currently-known professions which, when clicked, opens your tradeskill pa...
-
 First of all, I would like to introduce myself. You all may know me as Lynea, and I have retail experience with Retribution specificall...
