


11/11/2013

Hello friends! My name is Noobert or as some of you may know me, Incarael, from the guild <Care> on Sargeras. I have decided to make a guide showing you the potential of the forever underestimated tank on Molten -- a Protection Warrior. I have been tanking with a Warrior since The Burning Crusade on retail, to Molten's WotLK on Ragnaros and then into Cataclysm on Sargeras and I can tell it is one of my most favorite and exciting classes to play because of how mobile it is at tanking, surviving, and throw out damage. Many other tanks specialize in one aspect, but we specialize in all aspects.
This guide will show you the potential of a Warrior as well as the versatility, abilities, mobility, and power it can bring to a raid. I consider this Tank to be one of the best available in World of Warcraft, but as I have said -- due to bugs on Molten this class, is forever underplayed and underestimated. Hopefully this guide will show you otherwise and maybe create a few more Protection Warriors out there who share my love for this class.

- Talent Tree
- Glyphs
- Stat Priority
- Gemming and Enchanting
- Reforging
- Rotation
- Combat Table Coverage (CTC)
- BiS List - Non-Donor, Donor, and End Game
- Professions
- Macros
- Skill Knowledge
- Credits

This is the talent tree I currently use. I will explain everything below.

<The url will update when the site works>.
Due to the recent fixes Molten implemented for the MiT Tournament, they have fixed a few talents enabling the use of them again.
Incite 3/3 was taken to enable faster killing of Alysrazor Hatchlings in Heroic mode.
Shield Specialization 3/3 was taken after the fix to obtain maximized rage generation.
Blood and Thunder 2/2 in combination with Thunderstruck 2/2 was taken for Ragnaros' Molten Elementals.
Impending Victory 2/2 dropped for maximizing of Incite and Shield Specialization in Heroic encounters.
Deep Wounds 1/3 taken over Blood Craze 1/3 for a bit of extra damage on Voracious Hatchlings.

<The url will update when the site works>.
The only difference from the above and here is Deep Wounds 1/3 was dropped for Blood Craze 1/3 for an extra boost of health regeneration. You can rotate more talents from Incite (dropping to 2/3) and War Academy (2/3) if you do not need damage, to other talents such as Blood Craze 3/3.

<The url will update when the site works>.
As you can see I have chosen to take more damage output but you can maximize damage output or rotate in the health regeneration from Blood Craze. This is a talent specialization based around regeneration and kiting. An example would be on the Spine of Deathwing, Madness of Deathwing and Ragnaros, where you can slow the Corrupted Bloods as well as the Molten Elementals making the kiting and slowing process much smoother.

Prime Glyphs:
Major Glyphs:
Minor Glyphs:

This section will explain and show you the stat priority you will aim for as a Protection Warrior.
Mastery > Parry > Dodge > Stamina > Hit/Expertise
The reason you wish for this priority is so your damage intake is smooth with no spiking and you can mitigate as much damage as possible, since stamina soaking is not as effective in 4.3 -- it will be explained further in the Combat Table Coverage section below. Protection Warrior Guide Cataclysm

Meta Gem:
Eternal Shadowspirit Diamond (81 Stamina and 1% Shield Block Value)
Other Possibilities:
Effulgent Shadowspirit Diamond (81 Stamina and Reduce Spell Damage Taken by 2%) - I highly recommend this for heavy magic damage fights like Alysrazor.
Austere Shadowspirit Diamond (81 Stamina and 2% Increased Armor Value from Items)
Pre-Dragon Soul Gems:
Red - Fine Ember Topaz (20 Parry Rating and 20 Mastery Rating)
Yellow - Fractured Amberjewel (40 Mastery Rating)
Blue - Puissant Dream Emerald (20 Mastery Rating and 30 Stamina)
Other Possibilities:
Red - Defender's Demonseye (20 Parry Rating and 30 Stamina)
Yellow - Regal Dream Emerald (20 Dodge Rating and 37 Stamina)
Blue - Defender's Demonseye (20 Parry Rating and 30 Stamina)
Dragon Soul Gems:
Red - Fine Lava Coral (25 Parry Rating and 25 Mastery Rating)
Yellow - Fractured Lightstone (50 Mastery Rating)
Blue - Puissant Elven Peridot (25 Mastery Rating and 37 Stamina)
Other Possibilities:
Red - Stalwart Lava Coral (25 Parry Rating and 25 Dodge Rating) ** NOTE: The lesser version was removed from the game **
Yellow - Regal Elven Peridot (25 Dodge Rating and 37 Stamina)
Blue - Defender's Shadow Spinel (25 Parry Rating and 37 Stamina)
Enchants:
Head - Arcanum of the Earthen Ring (90 Stamina and 35 Dodge Rating)
Shoulders - Greater Inscription of Unbreakable Quartz (75 Stamina and 25 Dodge Rating)
Chest - Enchant Chest - Peerless Stats (20 Stats)
Back - Enchant Cloak - Protection (250 Armor)
Wrist - Enchant Bracer - Major Stamina (40 Stamina)
Gloves - Enchant Gloves - Greater Mastery (65 Mastery Rating)
Belt - Ebonsteel Belt Buckle (Extra Socket)
Legs - Drakehide Leg Armor (145 Stamina and 55 Dodge Rating)
Feet - Enchant Boots - Lavawalker (35 Mastery and Movement Speed Increase) OR Enchant Boots - Mastery (50 Mastery) OR Enchant Boots - Earthen Vitality (30 Stamina and Movement Speed Increase)
Weapon - Enchant Weapon - Windwalk (Sometimes increase Dodge Rating and Movement Speed)
Shield - Enchant Shield - Mastery (50 Mastery Rating)

There are two possibilities of your reforging, Mastery or balancing out your Parry/Dodge Rating. Mastery is more valuable to you and should always be chosen first as it gives more CTC to you as a tank than Parry or Dodge ever will. Mastery helps smooth over the damage you will take from each hit so you do not take spike damage like Death Knights or Feral Druids.

This topic will discuss the skill priority for rotations, enabling you to maintain the highest level of threat. One point of advice I can give you though is - learn the capabilities of your tank and learn how many cooldowns you will need to survive. Do not EVER use all of your cooldowns at once as it leaves you completely unable to survive should the time arise where you need it most.
Single Target Threat Generation:
Heroic Leap/Charge > Shield Slam > Devastate x3 > Revenge > Shockwave > Thunderclap/Demoralizing Shout.
Queue up Heroic Strike if you are not rage starved.
Area of Effect Threat Generation:
Heroic Leap/Charge > Rend one target > Thunderclap > Shockwave > Demoralizing Shout.
Queue up Cleave if you are not rage starved.
** IMPORTANT NOTE ** If you having trouble with threat, use Vigilance on the highest damaging player in your raid or the opposing tank as it will enable you to refresh your taunt with each hit he or she takes. Another way to use Vigilance is if your taunt is down, a newly spawned mob is running to a player - you can throw Vigilance on that target, taunt it off, and put it back onto another target if required.

Combat Table Coverage, otherwise known as CTC, is how close a tank is to becoming unhittable. The goal is to make sure every hit is either an inherent dodge (every character has 5% dodge chance, regardless of class or spec), dodge, parry, and block. After everything is taken into account, armor comes last further mitigating the overall damage you will take.
All tanks in Cataclysm should aim for 102.4% CTC because with each level ahead of you the bosses are they gain 0.8% chance to hit you. All raid bosses have three levels on you meaning they will have a total of (0.8 x 3) 2.4% hit chance on you. 100% + 2.4% = 102.4% total CTC needed to become almost completely unhittable.
CTC = 5 [5% Inherent Dodge] + (Your Dodge Rating) + (Your Parry Rating) + (Your Block Rating)
Credit goes to Wolololol for the CTC breakdown.

Non-Donor BiS List:
Head - Baleroc Heroic - Helm of Blazing Glory
Neck - Crystallized Firestone - Firebound Gorget
Shoulders - Majordomo Staghelm Heroic - Shoulderguards of the Molten Giant
Chest - Alysrazor Heroic - Chestguard of the Molten Giant
Back - Avengers of Hyjal Reputation - Durable Flamewrath Greatcloak
Wrist - Majordomo Staghelm Heroic - Bracers of the Fiery Path
Gloves - Baleroc - Handguards of the Molten Giant
Belt - Shannox Heroic - Uncrushable Belt of Fury
Legs - Shannox Heroic - Legguards of the Molten Giant
Feet - Blacksmith Crafted - Mirrored Boots
Weapon - Beth'tilac Heroic - Mandible of Beth'tilac
Shield - Baleroc Heroic - Shard of Torment
Ranged Weapon - Crystallized Firestone - Deflecting Star
Ring #1 - Avengers of Hyjal Reputation - Adamantine Signet of the Avengers
Ring #2 - Justice Point Vendor - Deflecting Brimstone Band
Trinket #1 - Beth'tilac Heroic - Spidersilk Spindle
Trinket #2 - Crystallized Firestone - Scales of Life
** If you are looking for a Normal Mode BiS - All of the items above are currently best-in-slot normal but there are other variants that can be just as good or better depending on the stats you need.
Trinkets are based off of your own preference, the current best ones available in normal mode are:
Spidersilk Spindle from Beth'tilac.
Stay of Execution from Avengers of Hyjal reputation.
Scales of Life from Firelands Trash.
Donor BiS List:
Neck - Guardspike Choker *
Shoulders - Colossal Dragonplate Shoulderguards
Chest - Colossal Dragonplate Chestguard
Back - Indefatigable Greatcloak *
Wrist - Graveheart Bracers
Gloves - Colossal Dragonplate Handguards
Belt - Goriona's Collar
Feet - Stillheart Warboots
Weapon - Mandible of Beth'tilac ** NOTE: This can only be obtained from Beth'tilac **
Shield - Blackhorn's Mighty Bulwark
Ranged Weapon - Unexpected Backup
Ring #1 - Hardheart Ring
Ring #2 - Signet of the Resolute *
Trinket #1 - Soulshifter Vortex
Trinket #2 - Indomitable Pride
* These items linked from WoWHead are the normal level of stats as there are no raid finder levels listed, check the coin shop for the correct stats.
End-Game BiS List:
Neck - Guardspike Choker *
Shoulders - Colossal Dragonplate Shoulderguards
Chest - Colossal Dragonplate Chestguard
Back - Indefatigable Greatcloak *
Wrist - Graveheart Bracers
Gloves - Colossal Dragonplate Handguards
Belt - Goriona's Collar
Legs - Foundations of Courage * OR Colossal Dragonplate Legguards
Feet - Stillheart Warboots
Weapon - Souldrinker
Shield - Blackhorn's Mighty Bulwark
Ranged Weapon - Unexpected Backup
Ring #1 - Hardheart Ring
Ring #2 - Signet of the Resolute *
Trinket #1 - Soulshifter Vortex
Trinket #2 - Resolve of Undying

On a high magic damage fight you can use the trinkets:
Soulshifter Vortex and the Indomitable Pride.
** Note ** All of the above items are Heroic quality except the noted above with a * above.
* These items linked from WoWHead are the normal level of stats as there are no Heroic levels listed.

These are the benefits to our class, choose which one you think is the most beneficial to you.
Alchemy - 80 Strength but this is not very useful to us.
Blacksmithing - Two extra gem sockets.
Enchanting - Two ring enchants equalling a total of 120 stamina.
Engineering - Grounded Plasma Shield (Absorbs 16200 to 19800 Damage - 5 Minute Cooldown), Quickflip Deflection Plates (1500 armor for 12 seconds - 1 Minute Cooldown), Spinal Healing Injector (27K to 30K Healing to Yourself - Shares Cooldown with Potions), or Synapse Springs (480 of your highest priority stat - 1 Minute Cooldown).
Herbalism - 480 Haste for 20 seconds, 2 Minute Cooldown.
Inscription - 195 Stamina, 25 Dodge Rating
Jewelcrafting - 27 (or 41 Stamina) stats per gem, maximum of three gems, which equals 81 bonus stats or 123 Stamina.
Leatherworking - 192 Stamina to Bracers.
Mining - 120 Stamina.
Skinning - 80 Critical Strike Rating.
Tailoring - 800 Attack Power for 15 seconds.
Personally, I would choose hard stat bonuses such as Jewelcrafting, and Blacksmithing. Since Shoulder Enchants are currently bugged on Molten, you can even take Inscription to cover the loss of the enchant that most people suffer.

These are just some macros I have developed to help increase my ability as a tank. There are many more out there, but these are just the ones I use.
#showtooltip
/cast [@mouseover] Vigilance
If you mouse over a player in-game or on raid frames and hit this macro, it will put Vigilance on that target.
#showtooltip
/cast [@targetoftarget] Intervene
This macro will Intervene the target of the player, or the mob you are targeting.
#showtooltip
/cast [target=focus] Intervene
This enables you to have more Intervene macros.
/script SetCVar ("cameraDistancemax" ,50)
This is the max camera distance macro and it will help you be more aware of what is going on around you as well as help position the boss correctly.
/script RepopMe()
If you ever get stuck falling the world or unable to release - use this macro. It will save your unstuck on the website to enable you to hunt more pets efficiently.

Every skill in the Warrior spellbook is useful, even right down to the most unused talents. Do not forget to go through your book and read the use of every skill as it will improve your ability to play a Protection Warrior ten fold.
Concussion Blow - 5 Second Stun with high damage output. It can be used to stun mobs that need to be delayed from casting (if stunnable) as well as stopping mobs like Alysrazor's Initiates from igniting her.
Devastate - High threat attack, applies or refreshes Sunder Armor and a low rage cost.
Revenge - Usable after a successful block, parry, or dodge costing only 5 Rage and hitting two targets (if specced).
Shield Block - Shield Block increases the chance to block by 25% for 10 seconds, and if specced into - reduces the magic damage taken by 20% for 6 seconds.
Intervene - Friendly version of charge and if used on somebody, it will reduce their total threat by 10% as well as allow you to take one attack for them.
Shield Slam - Huge threat generation ability as well as dispels one magic effect on the target.
Last Stand - This will increase your health pool by 30% for 20 seconds.
Shield Wall - This skill reduces the damage you take by 40% for 12 seconds. Once you obtain Tier 13, this will also effect the entire raid.
Shockwave - Frontal Area of Effect stun for 4 seconds.
Rallying Cry - Increases the raid members health by 20% for 10 seconds.
Victory Rush - Heals 24% of your current health (or if specced into with a proc 10% of your total health).
Pummel - This is our only hard interrupt, use it wisely.
Inner Rage - Many people forget about this skill, but it helps with area of effect tanking as well as single target tanking if used on cooldown.
Enraged Regeneration - Heals 36% of your total health over 10 seconds. Combine this with Last Stand or Rallying Cry for an even greater effect.
Thunderclap - The highest Area of Effect generation skill and in Dragon Soul it will save your life on Spine/Madness of Deathwing as it reduces time between attacks by 20% for all mobs under its effect.

This completes the guide. Thank you for reading and I hope you will learn as much as I did while making this guide.
If you are going to learn anything from this guide, remember that a tank is only as good as the player controlling it. If you want to tank, you have to strive to be the best available because you control the raid and if you are unable to maneuver, adapt, etc. you will be unable to progress.
I hope you enjoyed the guide and I hope you enjoy reading it as much as I did typing it. If you have any questions, comments, etc. I will happily answer them as I see them.
Noobert
Originally, Wolololol refused to create my banners and this is what I had come up with. I feel I am an amazing artist.

Credit goes to..
Wolololol for taking pity on me and making the Banners and Headers again and my guildies on <Care> for the support and dedication to make me a better player and person.
Check out the other guides written by myself, and members of Care!
This guide isn't made originally from us this is just copied from Molten Wow Forum.
10/29/2013


My shaman's name is Speed and I play on Sargeras. What peaked my interest in elemental shaman is the concept of a nature mage that summons totems and guardians for an overall unique expirence. I have gone to great lengths and even though I may not be the best, I'm better than most of i've came across.
The infomation I provide are the results of reading countless guides, running tons of simulations, and a boatload of field tests which include raids, dungeons, and test dummies. My current progression is 5/6 bwd normal, 2/6 bwd herioc, 4/4 bot, 6/7 fl normal.
The elemental shaman is able to provide high dps and provides a good ammount of utility. Any mistakes you make such as letting flameshock or searing totem expire, stacking lightning shield past 9 charges, delaying lava burst, letting even a half second go by without casting, or improper cooldown usage will severely harm your dps. You have to be on your A game, reflex and focus are key along with a well setup spec and gear build. Don't let all of that intimadate you though as it becomes quite enjoyable and even has a certain rythme to it.


These are the core talents required for all aspects of the PvE environment. You only have 3 leftover to play with. However those spare point can be used for survivability, utility, crowd control, or even a fun aoe cc.
Elemental Warding-Reduces magic damage taken by 4/8/12%. This is always on and most raid damage is magic damage.
Earth's Grasp-Earthbind Totem has a 50/100% chance to root nearby targets for 5 seconds. I have personally been in situations where rooting mobs prevented a wipe, however this is highly situational.
Earthquake-Deals physical damage every second to enemies in an 8 yard radius, with a 10% chance to knockdown and lasts 10 seconds. In pretty much any aoe situation, you will spam chain lightning but it's still viable to drop one of these before you do.
Totemic Reach-Increases the range of your totems' effects by 15/30%. Normally you would take this to extend the range of searing totem but with molten's ai bugs, it will increase the chance of it ninja pulling.
Ancestral Resolve-Reduces any damage takenwhile casting by 5/10%. As an elemental shaman, you should always be casting which makes this a bit heavier than elemental warding.

Prime
Flame Shock-Increases Flame Shock duration by 50%. Flame Shock is weak in general but this glyph allows you to refresh it less while spending more global cooldowns on harder hitting abilities.
Lava Burst-Increases the damage of Lava Burst by 10%. Makes one of your best spells better.
Lightning Bolt-Increases damage of Lightning Bolt by 4%. Lightning Bolt will makes up a huge chunk of our damage and is probably our most casted spell.
Unleashed Lightning-Allows you to cast Lightning Bolt while moving. Gives elemental shamans the ability to be so much mobile which is very important for fights such as alysrazor, shannox, omnitron, atramedes, halfus, and ascendant council. Replace with Lava Burst glyph if you know you will be missing it on cooldown.
Major
Lightning Shield-Lightning Shield can no longer drop below 3 charges. Means you never need to recast it. Always use.
Chain Lightning-Hits 2 additional targets but deals 10% less initial damage. Gives Chain Lightning the ability to hit 5 targets instead of 3. On 4+ mobs, its a dps gain. 2-3 and you can swap this out.
Healing Stream Totem-Your Healing Stream Totem will give 195 frost, fire, and nature resist to all members in range. Best choice for 3rd glyph but swap out if a restoration shaman wants you to drop mana spring or tranquil mind.
Stoneclaw Totem-Stoneclaw totem will give a 16k shield with a 20 second cooldown. Since we don't need earth totems to help with dps, this is completely viable choice for 3rd gylph.
Minor
Thunderstorm-Increases mana gained from Thunderstorm by 2% but will no longer knockback or reduce movement speed. Unless your required to knockback during an encounter, glyph this. Not for the mana regen but for the sake that you don't knock mobs into a wall. Don't be that guy.
All other minor glyphs provide utility or cosmetics which will contribute nothing in a raid environment.

Intellect>Spirit/Hit 17%>Haste>Mastery>Critical Strike
Intellect-Highest ranking stat. It's our main source of spellpower, increases mana pool size, and provides critical strike.
Spirit-With elemental precision 3/3 which is a mandatory talent converts ever point of spirit into hit rating. Learn to see spirit as hit rating since its almost identical.
Hit Rating-Along with spirit should be your number 1 priority until you're at or slightly below hit cap. A single missed attack can knock your dps down a few pegs. Any point above is considered wasted. !7% for all races at this current time.
Haste-Faster spell casting and shorter global cooldowns. There all no haste breakpoints for elemental. The dps gain is linear and for this current tier gear, more is better.
Mastery-Our mastery gives us a chance to for lightning bolt, lava burst, and chain lightning to trigger itself and cast another version that does 75% normal damage and no threat. Its a nice stat to aim for on gear but it should be reforged for spirit if under hitcap or haste.
Critical Strike-Your best spell has a 100% crit chance which makes critical strike garbage for elemental shamans. This should be the first stat reforged and avoided if possible.

This is the result of a simulation ran 10,000 times using a helter skelter fight mode using bis tier 12 gear.

Meta-Burning Shadowspirit Diamond +54 intellect and 3% increased critical effect.
Red-Brilliant Inferno Ruby +40 intellect
Blue-Purified Demonseye +20 intellect and +20 spirit
Yellow-Reckless Ember Topaz +20 intellect and +20 haste
Head-Arcanum of Hyjal +60 intellect and +35 crtitcal strike
Shoulders-Greater Inscription of Charged Lodestone +50 intellect and +25 haste.
Cloak-Greater Intellect +50 intellect
Chest-Peerless Stats +20 All Stats
Wrist-Mighty Intellect +50 intellect
Gloves-Greater Mastery +65 Mastery
Legs-Powerful Ghostly Spellthread +95 intellect and +55 spirit
Feet-Haste +50 haste
Shield-Superior Intellect +40 intellect
Weapon-Power Torrent 500 intellect for 12 sec when dealing damage or healing with spells
Reforging Priority as follows: Spirit/Hit to 17%>Haste>Mastery>Critical Strike.
If you don't have 17% hit, reforge lowest ranking stat Hit Rating or Spirit
If you're over 17% hit, reforge some Hit or Spirit to Haste or Mastery.
Reforge any leftover Crit to Haste or Mastery.

Alchemy: +80 intellect from flasks through Mixology
Blacksmithing: +80 bonus from two bonus sockets on bracers and gloves.
Enchanting: +80 intellect from two ring enchants.
Engineering: Synapse Springs which average out to +80 intellect. 450 int for 10 seconds with a 60 second cooldown.
Inscription: +80 intellect from shoulder enchant.
Jewelcrafting: +81 intellect from 3 intellect gems. When epic gems are released, the value will go down to +51 intellect.
Leatherworking: +80 intellect from fur lining.
Tailoring: cloak enchant that procs 580 intellect for 15 seconds.
Herbalism: 480 haste for 20 seconds every 2 minutes.
Mining: +120 stamina.
Skinning: +80 critical strike rating.

These really are the only choices that make any significant boost in your dps and are pretty easy to acquire.
Elixer:Flask of Draconic Mind +300 intellect
Food:Severed Sagefish Head +90 intellect and +90 stamina
Potion: Volcanic Potion +1200 intellect for 25 seconds
Scroll: Intellect IX +100 intellect.

Always make sure lightning shield and flametongue weapon are active. I seen people mess that up.
Single Target
1) Searing Totem. Fire Elemental totem if have all spellpower procs/cooldowns ready and you can drop it on the boss.
2) Flame shock and refresh with 3 seconds left on duration.
3) Lava burst on cooldown when flame shock is up.
4) Earth shock when you have 7-9 stacks of lightning shield and flame shock has 6+ seconds remaining.
5) Lightning Bolt when all other priorities have been taken care of and while moving.
Unleash elementals was removed from our rotation completely since it uses a gcd and was only used while moving. We have glyph of unleased lightning to thank for that.
Multiple Target
Spam chain lightning.
Earth shock at 7-9 stacks of lightning shield.
Earthquake is optional but if you're specced into it, use it when there's 5 or more targets.

Earth
Stoneskin Increases armor by 4076. Stacks with paladin's devotion aura.
Strength of Earth +549 strength and agility. The same buff is apply by but does not stack with death knights Horn of Winter, warrior's Battle Shout, and hunter's Roar of Courage.
Tremor Totem Breaks fears, charms, and sleep effects for 6 seconds with a 1 minute cooldown.
Stoneclaw 16k personal bubble with a 20 second cooldown.
Fire
Flametongue 6% spellpower increase. Does not benefit from totemic wrath(+10% spellpower increase). Useless.
Searing Shoots bolts of fire at single enemy and benefits from totemic wrath which will increase all party/raid members' spellpower by 10%. Always use. This spellpower increase is also provided by warlock's Demonic Pact.
Magma- Deals fire damage to all enemies within 8 yards. Also benefits from totemic wrath. Very situational. I only really use it when I fear searing totem will ninja pull.
Fire Elemental Much better than searing totem and is a dps increase especially when used with intellect procs and cooldowns. Also benefits from totemic wrath. However it is severely broken and unpredictable. Lately I have been testing and it is scaling better with spellpower/intellect procs and is a very nice dps boost if it runs in right away. I dropped this on Ragnaros and it took 30 seconds before it finally started attacking.
Water
Healing Steam Heals all party members in range. Also stacks with other healing steam totems and benefits from spellpower/intellect procs. Also provides 195 frost, fire, and nature resistence when glyphed.
Mana Spring Increases mana regen by 326 per 5 seconds. Currently stacking with paladin's Blessing of Might.
Tranquil Mind Reduces pushback when casting by 30%. Does not stack with paladin's concentration aura.
Air
Wrath of Air +5% spell haste. Does not stack with shadow priest's Mind Quickening or balance druid's Moonkin Aura.
Windfury+10% melee and ranged attack speed. Does not stack with death knight's Improved Icy Talons or hunter's Hunting Party.
The totems you should have queued generally as an elemental shaman are Stoneskin, Searing, Healing Stream, and Wrath of Air. Assess the needs of the group and place totems accordingly.

Special thank you to Wolololol for the images and to <Care> for giving me to opportunity to flourish as an elemental shaman. Also Noobert for teaching me how to make colored text.
Guides written by other <Care> members.
And [Guide] Firelands Normal which is the highest tier of raiding at the moment.
I plan to add a bis list and expand on the rotation with cooldown usage at a later time.
Bugs
Lava Burst elemental overload proc should have a 100% crit chance when hitting a target afflicted with flame shock but it doesn't.
Searing Totem not prioritizing targets with flame shock.
Flametongue Weapon not benefiting from elemental weapons talent.
Fire Elemental Totem is a major dps cooldown but refuses to join the fight or just slaps the enemy when he does.
Earth Elemental Totem is also severely broken but not that high of a priority. Contributes roughly 500 dps if fixed and really run to use.
Dreanei's Heroic Presence is supposed to give 1% hit but doesn't work at all.
This guide isn't made originally from us this is just copied from Molten Wow Forum.
10/27/2013

This guide will contain information that may be helpful to you as a Priest Healer in the Cataclysm dungeon and raid environment, which is exclusively designed for Molten. You will know which stats are important, key talents and spell, the rotation/healing method, and much more. This guide will be updated and improved regularly as new updates happen on our server.

- Problems Faced by a Holy Priest
- Talent Overview
- Glyphs
- Stats
- Chakra
- Rotation
- Consumables
- Gems & Enchants
- Professions
- Credits

Mana Issue
Unless you get the end-game gears, you will get several mana issues whenever healing a dungeon/raid. Something seems to be costly, everything seem to be costly, thus forcing you to reserve your mana a lot and prevent yourself from pulling out the best healing performance you can do. Shadowfiend, Hymn of Hope, and 50% combat mana regeneration from Spirit are the 3 main sources of your mana gain during combat.
Transitioning from a Dungeon Healer to a Raid Healer
For Priests who finished their dungeon healing duty and start to working on raid healing, they have tendency to feel nervous and casting unneeded healing spell, fearing a raid member will die and he will get removed from raid because of that. Remember that you are not the only healer in your raid group, and judged from the spells you have, people prefer to see you as a raid healer doing AoE heal when it’s the time. Start forgetting your Flash Heal spam habit and work on group healing spells.
Outperformed
Once you become a raid healer, sometimes you feel disappointed when you had performed the best healing performance for your raid group but in the Recount statistic you never get into the peak of Healing Done (people judge healers’ performance in an encounter based on Recount sadly). Plus the mana status you have compared with other classes clearly shows that they provide more Healing Done than your own with less mana spent.

Dungeon Healing Talent
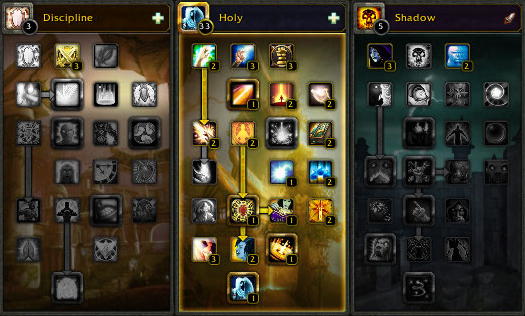
Key talents:
Surge of Light: the rates you will use Flash Heal on dungeons is high. You will use Flash Heal to heal almost all the time. An extra FH, no mana cost and instant, helps your healing duty
Veiled Shadows: the cooldown reduction of your Fade helps avoid mobs which are chasing on you due to your healing agro. The Shadowfiend cooldown reduction also helps you regain mana faster without drinking, even when you are in combat bug (CB)
Blessed Resilience: since decades ago many players even on retail keep mentioning this talent as PvP talent, but if you review again this talent description and the actual situation happen in Cataclysm dungeons, you will prefer to have this so you will be easier to be healed fully. Combined by Binding Heal, you will feel comfortable healing people without worrying your own HP (check Rotation section)
Note: this talent sometimes doesn't work with non-player damage
Raid Healing Talent
Talents circled with purple are OPTIONAL
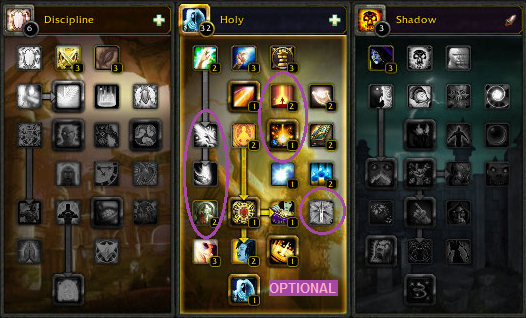
Key talents:
Circle of Healing: heals up to 6 members (when glyphed) instantly. Use this whenever off cooldown. Check Rotation section how to utilize it properly for maximum result
Heavenly Voice: when specced this one, your Divine Hymn will provide around a total of 300k-500k Healing Done within 8 seconds duration every 3 minutes, and increasing the healing received for your raid members by 10% everytime the healing tick received, which becomes the key spell for Holy Priest in raid
 Lightwell: only smart players will use Lightwell, so make sure people around you will truly have commitment to use it before you spec this one. It’s already become an ancient issue around Priest healers that raid members often ignore Lightwell. They are busy DPSing and have no time to move their mouse cursor to click it. Blizzard improves the Lightwell in Cataclysm by making it clickable from distances (40 yards) but still it won’t change the fact that people (especially pugs) rarely use it and sometimes abuse it when out of combat
Optional talents:
Surge of Light: useful for single target healing while in raid, (Shannox, Baleroc, etc.)
Blessed Resilience: this talent should be good but if you want to maximize your capability in raid, you may unpick this talent and pick other optional talents
Note: this talent sometimes doesn't work with non-player damage
Divine Touch + Rapid Renewal: many Priests don't use Renew a lot since mana cost is too high. If you use Renew for tank only, you don't really need these talents. If you spam Renew a lot to many members, these are good additions
Body and Soul: useful when you are needed to move faster for small moment (Ragnaros, Alysrazor, Chimaeron, Atramedes, etc.)

Prime
Glyph of Prayer of Healing: spamming PoH to as many groups as possible will grant this HoT to each members which is really good
Glyph of Renew: if you use Renew a lot, you will use this glyph. Check Rotation section to know the appropriate time to use Renew
Glyph of Flash Heal: useful for dungeon healing, as well as raid healing. Unlike WotLK, Cataclysm dungeons bring party members into difficult and critical situation on mobs and boss encounters which requires you to use Flash Heal a lot. On raids when you have to do triage healing during critical moment, this glyph helps you handle the situation
Glyph of Guardian Spirit: rarely happen when you need to use GS more than one time during a boss encounter (mostly used at the last phase of most boss encounters) but just in case you will need to use Guardian Spirit more than one time, this glyph is a wise choice
Glyph of Lightwell: when you take Lightwell talent, you will prefer this talent compared to Glyph of Renew / Glyph of Guardian Spirit to maximize the usage of your Lightwell
Major
Glyph of Circle of Healing: as a raid healer you will use CoH almost all the time whenever it’s available. This is not a good glyph for dungeon healer
Glyph of Prayer of Mending: make your PoM heals larger on initial target
Glyph of Holy Nova: useful for healing on the move situation. Check Rotation section for more information
Glyph of Mass Dispel: some encounters require you to cast Mass Dispel, especially in dungeon instances. This glyph helps you cast the spell faster so you can continue doing important things
Glyph of Fade: useful for dungeon healing to avoid healing agro on mobs
Minor
Glyph of Levitate: the reagent for Levitate without the glyph requires you to farm some mobs in specific zones. So better use this glyph without wasting your time farming the reagent or wasting your bag slots.
Glyph of Fortitude: when you are in combat, sometimes you are asked to rebuff in case someone miss the buff, or suddenly combat resurrected and need rebuff. Reducing the mana cost of this buff will save your mana.
Glyph of Shadowfiend: rarely happen to see Shadowfiend dies from something, but nothing is impossible so instead of regretting later while in combat for seeing your Shadowfiend dies unexpectedly and not giving full mana potential for you, better glyph this one.

Intellect > Spell Power > Spirit > *Haste/Mastery > Critical Strike
Intellect: This stat gives spell power, mana pool, and small critical chance. This is the most important stat for you, so you will want to have Flask/Scroll/Well Feed buff related to this stat.
Spell Power: This stat usually found in trinket and PvP gear. As you already know, SP increases the amount of all your healing done.
Spirit: Spirit helps mana regenerations while/while not in combat. During a combat, 50% of your spirits work and actively generates mana. It helps you for long duration fight. Always focus on this stat if you are a dungeon healer with mana issue.
Haste: This stat makes some usefulness. The casting speed of all healing spells will be faster, your Renew will tick faster, Divine Hymn will tick faster (rumored to be not working in Molten), so do Hymn of Hope. 12.5% haste is the cap to get an additional Renew tick so you should aim on this number IF you truly care about Renew healing (check Rotation to see how useful Renew is for you to use in raid environment).
Also take a note that in raids with Heroic difficulty, Haste is somewhat better than other stats as you need to give a fast heal to raid member since they are most likely brought into critical health frequently.
If you are a raid healer and want to get the best possible stats benefit, you can let your passive/unbuffed Haste sitting at low percentage and get the Haste stats from raid buffs, combined with Darkness talent to achieve 12.5% (even more) pretty easily so you can allocate your Haste to other useful stats like Mastery, Spirit, etc. if possible.
If you have Atonement/AA Discipline off-spec and share the same gears with your Holy spec, you can focus more on this stat.
Mastery: Most people prefer Haste than Mastery, but actually Mastery gives real-time healing (called Echo of Light) if you know how to utilize it properly (check Rotation section to know how Mastery take part on healing showdown). Unlike Haste, you can’t get this stat from anywhere else other than your gears (the gear stat, enchants, and gems). If you sometimes get lag in-game (commonly happen in Molten) or having bad latency due to ISP/geographic issue, Mastery helps your healing as the healing done per tick happens on server-side.
If you have Shield/non-AA Discipline off-spec and share the same gears with your Holy spec, you can focus more on this stat.
Critical Strike: Increase the chance your healing spell critted, good for direct healing (specifically tank healing) but Priest is preferred to be a raid healer. Check Rotation for more explanation.

Don’t forget to activate your Chakra state upon entering an instance, because it keeps resetting upon changing zone
Serenity
This mode is designed for single target and direct healing. You can read the description in-game for more information. Enabling this mode will grant you a new healing spell: Holy Word: Serenity which heals almost as same as Flash Heal (a bit lower) instantly with around 1% mana cost. Use this as a filler of your Flash/Binding/Greater Healer whenever the casting finished to increase EoL heal amount per tick. Or you can just spam it whenever it's off cooldown to small heal players during regular mob fights.
Sanctuary
This mode is designed for AoE healing. You can read the description in-game for more information. Enabling this mode will grant you a new healing spell: Holy Word: Sanctuary which heals quite a lot if people can manage to stack inside the heal area together. Mana cost is too high and going to be a waste if not used properly. The only important part of this Chakra mode is the cooldown reduction of CoH and 15% more healing done with AoE healing spells like CoH, PoH.

Experience and Expectations
First of all, you have to understand the situation and what will happen to your party/raid members. It means that you need past experience on the instances where you are going to heal the group at. With the experience you have, you will understand what rotation you should use effective and efficient. You will not always become the healer who need to heal at new places. Being used to similar situation happened in your previous run can help you determine the most effective and efficient method of healing.
Think what should be casted next when channeling a spell
You shouldn’t let your character remain idle and sit like an AFKer even just for 1-2 seconds, and thinking what spell you should cast. Keep casting spell and while the channeling bar is moving, start thinking what spell you should cast next by watching the HP condition of all of your group members, the buffs you have, the encounter events, etc.
Dungeon Environment
General
Spells focus: Flash Heal, Binding Heal, Holy Word: Serenity, Greater Heal, Prayer of Mending, Prayer of Healing, Circle of Healing, Fade
Enable Inner Fire and a desired Chakra state based on situation, Serenity is recommended due to the single target healing effectiveness. Always put Renew on tank (don’t do it if you have mana issue), refresh it with Flash/Binding Heal or HW: Serenity (Chakra: Serenity state). Shoot Prayer of Mending on a player and refresh it whenever it’s charge is empty/running out, or when your Divine Fire (mana buff from Tier 12 2p set bonus) buff duration is about to end.
When healing a dungeon, ALL of your party members (including tank and yourself) will be your own responsibility alone. You will use Flash Heal to heal tank and DPSers, but when you know you are getting some damage as well (or know you will get a damage from your past experience at the same situation), you should use Binding Heal. Why?
- Flash Heal and Binding Heal uses the same mana amount and casting time. Flash Heal does larger healing done to one target for sure, but Binding Heal does 60-80% of the Flash Heal amount to your target, and to yourself as well (not split/shared). Binding Heal creates 2 EoLs effect (stacking Mastery will give a better result) on 2 targets (you and your target) which again increase the healing done and effectiveness. Letting EoLs ticks will give time for Spirit to fill your mana slightly for some moments, or when you have to heal other player(s) after dealt with the previous healed target.
- Binding Heal prevents you to get confused and panicked when you suddenly get an unexpected damage. Combined with Blessed Resilience you can heal up yourself without having to cast Flash/Greater Heal on yourself and letting others not getting healed (in case other members are injured).
- Binding Heal saves your mana so you will not spend another mana to heal yourself with Flash Heal.
Casting Flash Heal or Binding Heal will give you Serendipity buff. This buff decrease the mana cost and casting time of your next Greater Heal or Prayer of Healing. To be a wise healer, don’t always think you have to spend this buff immediately like DK’s Killing Machine. Just reserve this buff for later use and when bad things finally happen:
- Use Greater Heal on someone who badly injured/suddenly get a lot of damages and about to die
- Use Prayer of Healing when groups (3-5 players) need your heals
When you are casting PoH, immediately cast CoH as soon as the casting of PoH finished, reason is to increase EoLs heal amount per tick (stacking Mastery will give a better result). This EoL with Glyph of PoH will become a very strong HoT for your party group, cheaper and more effective than Renew.
As you are going to utilize Flash/Binding/Greater Heal to perform single-target healing, use Serenity Chakra and cast Holy Word: Serenity whenever it’s off cooldown.
Fade spell takes very important role when healing a 5-man party (dungeon) as you will have 1:5 chances of agroing mobs with your healing activity.
Raid Environment
The Basic
Spells focus: Circle of Healing, Prayer of Healing, Prayer of Mending, Divine Hymn, Holy Word: Sanctuary
Enable Inner Fire and a desired Chakra state based on situation, Sanctuary is recommended because of CoH+PoH healing amount increase by 15%. Also, HW: Serenity from Serenity mode will turn overheal easily when casted periodically, while other healers can handle direct heal better in general.
When you are healing a raid, you can give less focus on taking care the tank (as explained in the very first part of Rotation section) so you will not blindly spend your mana, trinket, and enchant procs. Remember that other healing classes can perform better on handling tank healing. To be not so ignorant, you can put Renew on tank, even I guarantee it will turn to be overheal against other healers’ spell like Earth Shield, Beacon of Light, Lifebloom, etc. during normal tanking situation.
You will cast Circle of Healing whenever its available and off cooldown, but for sure don’t spam it blindly when actually raid members don’t need any heal at all. Use Prayer of Healing while waiting for the availability of your CoH. Do not build Serendipity in order to perform PoH, this talent isn’t truly designed as a ritual to perform PoH/GH, rather than as compensation when you have to use Flash/Binding Heal on badly injured raid member.
If possible, use CoH immediately after PoH without delay to enhance Echo of Light heal ticks.
Shoot Prayer of Mending to a raid member that is likely to get a damage later, and when you know other members around him/her will get some damages as well (example: Melee group on Lord Rhyolith). Some guides say you should cast it on tank, but healing amount potential for this spell benefits more to non-tank players.
Put Holy Word: Sanctuary on the ground when you know a group of raid members are going to get damage and capable to stack altogether into one place. The appearance of this spell is catchy so they will surely move to the spot.
Use Divine Hymn when things are really uncontrollable. Example when 2/3 of the raid members are dying and none of the healers are capable to control the situation, you can be the one who step forward and cast this spell. You can use Divine Hymn when a great number of players get damaged at the start of the encounter and you know you will be able to use DH again 3 minutes later (example: Ascendant Council). Do not try to reserve this spell and sacrifice the life of many people. Use it when you have to, the cooldown is only 3 minutes if you have the correct talent.

Advanced: PoH Healing Technique
Spells focus: Prayer of Healing, Circle of Healing
As your raid getting AoE damage, spam casting PoH on each group (G1 > G2> GX > …) and don’t give your next PoH cast to the same group unless needed. The reason:
- We will utilize EoL and Glyph of PoH as the HoTs for group member, so when you cast the next PoH to other group, the previously healed group will get the shower of your HoT. The moment their HoTs expired, that time you can fire PoH again to the group.
- Do not afraid the group will die if you just cast PoH one time to that group, since you are not the only healer in the raid.
- If indeed the group need more PoH from you and can’t be left with the HoTs (mostly 10-man raid) then feel free to cast PoH again to that group.
You don’t have to aim for Serendipity buff when healing raid or doing PoH spam. The triage healing mechanism requires you to prioritize your heal on someone who truly need a focused heal, instead of just spamming AoE heals and letting someone dies. Use Flash Heal to heal someone who badly injured, but don’t spam it blindly because other healer’s spell will eventually arrive before/after the moment your Flash Heal arrives. By doing this, you will get Serendipity buff which counts as “compensation” for the Flash Heal you made. Usually when other healers are busy AoE healing and you have to do Flash Heal on most injured raid member alone, aim Serendipity by casting Flash Heal 2 times, and then finish it with Greater Heal. Else, continue spamming PoH + CoH.
Remember to use CoH immediately after PoH to increase EoL heal amount per tick.

Optional: Renew Healing Technique
Spells focus: Renew, Circle of Healing, Inner Will
Recently I found some Priests do Renew spam on raids (just like Druid’s Rejuvenation spam in WotLK expansion) which mostly dominates the Healing Done statistic in raid. This is a blind healing method because you will just give Renew HoT to as many players as you want without realizing if the raid truly need the tick. It’s nothing wrong to do Renew spam but make sure you use this method properly in correct situation.
- If you have less than 300-500 ms latency to utilize Rapid Renewal at maximum rate
- If you know encounter will get finished before all your potential mana amount get rinsed
- If you know Triage healing won’t be needed, or someone else going to do it (means someone will not get injured badly and frequently, which requires your attention)
- If you have large intellect/mana pool (means quite decent gears will be needed)
- If the encounter truly create raid wide damage towards your member all the time/most of the time, and you have to keep moving (example: Atramedes)
You will need to use Inner Will and pick Mental Agility talent to reduce Renew mana cost, but still your mana will get burned hard.
Other: Direct Healing Focus in Raid
Rarely happen when a Priest is asked to focus on direct heal in raid environment (mostly for tank healing) but it will happen for sure. We can take example about Shannox encounter in Firelands. Raid members will not get any damage together at the same time during the encounter, but most damages happen to single target (damage from Shannox towards tank, and damage from Rageface towards random members every around 20-30 seconds) which requires a very serious large direct heal.
Same like Dungeon Healing, use Flash Heal on the target 2 times, then finish it with Greater Heal, and then repeat when needed. Remember to avoid any overhealing done so stop the heal when the target is at full HP or about to get full HP from other healing sources. Use Guardian Spirit when the victim will be guaranteed to be dying critically, and keep healing the target.
Remember Holy Priest is a raid healer, so try remove the habit of doing Dungeon Healing method when you are in a raid group.

Situational: Healing on the Move
Spells focus: Holy Nova, Circle of Healing, Prayer of Mending, Renew
Sometimes, both in dungeon and raid environments, even on PvP situation as well, you are put into a situation where you have to keep moving and provide healing output, not even allowed to stand still for just 1 second. The fact is that most of our spells require us to stand still and channel them. Unlike Resto Shaman, Holy Priest doesn't have the spell which gives you the ability to cast non-instant healing spells while moving.
Use Circle of Healing whenever it’s off cooldown, and when needed of course.
When 3-5 players need immediate heal, make sure to get closer with them for at least 10 yards, then begin to pop Holy Nova. It’s spammable but be careful with your mana. Combine it with CoH to finish the job, recommended at the end of spam to increase EoL healing amount per tick.
Shoot Prayer of Mending to a party/raid member which is not alone (have other player(s) around him/her for at least 20 yards range). No need to spam it so your mana will be safe. You can cast it as well on the tank, combine it with Power Word: Shield to maximize the usage.
Use Renew when someone start getting some damage, or when they are far from PoM range, alone, and/or requires regular HoT ticks. Usually a tank requires it on this situation.
It’s highly recommended to use Inner Will to reduce the mana usage of all those spells, as well as to increase your movement speed.

Foods
Severed Sagefish Head: 90 Int 90 Stamina
Delicious Sagefish Tail: 90 Spirit 90 Stamina
Flasks
Flask of the Draconic Mind: 300 Int
Flask of Flowing Water: 300 Spirit
Scrolls
Scroll of Intellect IX: 100 Int
Scroll of Spirit IX: 100 Spirit
Potions
Mythical Mana Potion: instant 10,000 mana restoration
Potion of Concentration: 22,000 mana over 10 seconds, interrupted by damage taken/spell casting

Gems
Meta: Ember Shadowspirit Diamond (54 Int + 2% maximum mana) / Burning Shadowspirit Diamond (54 Int + 3% increased critical effect)
Red/Prismatic socket: Brilliant Queen's Garnet (50 Int)
Blue socket: Purified Shadow Spinel (25 Int 20 Spirit)
Yellow socket: rtful Lava Coral (25 Int 25 Mastery) / Reckless Lava Coral (25 Int 25 Haste)
Enchants
Head: Arcanum of Hyjal (60 Int + 35 Crit)
Shoulder: Greater Inscription of Charged Lodestone (50 Int + 25 Haste)
Back: Lightweave Embroidery (proc 580 Int) / Greater Intellect (50 Int)
Chest: Peerless Stats (20 all stats) / Exceptional Spirit (40 Spirit)
Wrist: Mighty Intellect (50 Int)
Hands: Synapse Springs (480 Int/minute) / Greater Mastery (65 Mastery) / Haste (50 Haste)
Waist: Ebonsteel Belt Buckle (1 Prismatic socket)
Legs: Powerful Ghostly Spellthread (95 Int, 55 spirit)
Feet: Mastery (50 Mastery) / Haste (50 Haste)
Weapon: Power Torrent (proc 500 Int) / Heartsong (proc 500 Spirit)
Off-hand: Superior Intellect (40 Int)

Alchemy: +80 bonus on flask (Int/Spirit)
Blacksmith: +80 bonus from two extra sockets
Enchanting: +80 Int from ring enchants
Inscription: +80 Int from shoulder enchant
Leatherworking: +130 Int on Wrist enchant (in place of 50 Int enchant)
Tailoring: cloak enchants proc 580 Int / 580 Spirit
Engineering: Synapse Springs gives 480 Int on use, 1 min cooldown
Jewelcrafting: +80 Int
Herbalism: Haste cooldown from Lifeblood
Mining/Skinning: Stamina and Crit are on lowest priority

Epic: creator of the guide
Wolololol: banner picture and headers
My guildies on <Care> for the support
This guide isn't owned by us this is just a copy from the Molten Wow Forum.
Subscribe to:
Comments (Atom)

Popular Posts
-
When we start out in this guide there's obviously going to be a difference in the beginning for Alliance and Horde for this guide becau...
-
Hello everyone and welcome to yet another one of my guides in this one we will help you so you know were to go to get herbing up the fastest...
-
 Contents: 1. Stat caps 2. Early Combat spec and play style 3. Late Combat spec and play style 4. BiS list 5. Enchants 6. FAQ ...
 -
AckisRecipeList - A LDB plugin which provides a menu of your currently-known professions which, when clicked, opens your tradeskill pa...
-
 First of all, I would like to introduce myself. You all may know me as Lynea, and I have retail experience with Retribution specificall...
